Chat Screen
The Chat Screen is where you manage and respond to all conversations across your connected channels. It brings every message into one organized interface, making it easy to stay on top of interactions, collaborate with your team, and take action quickly.
Inbox Module
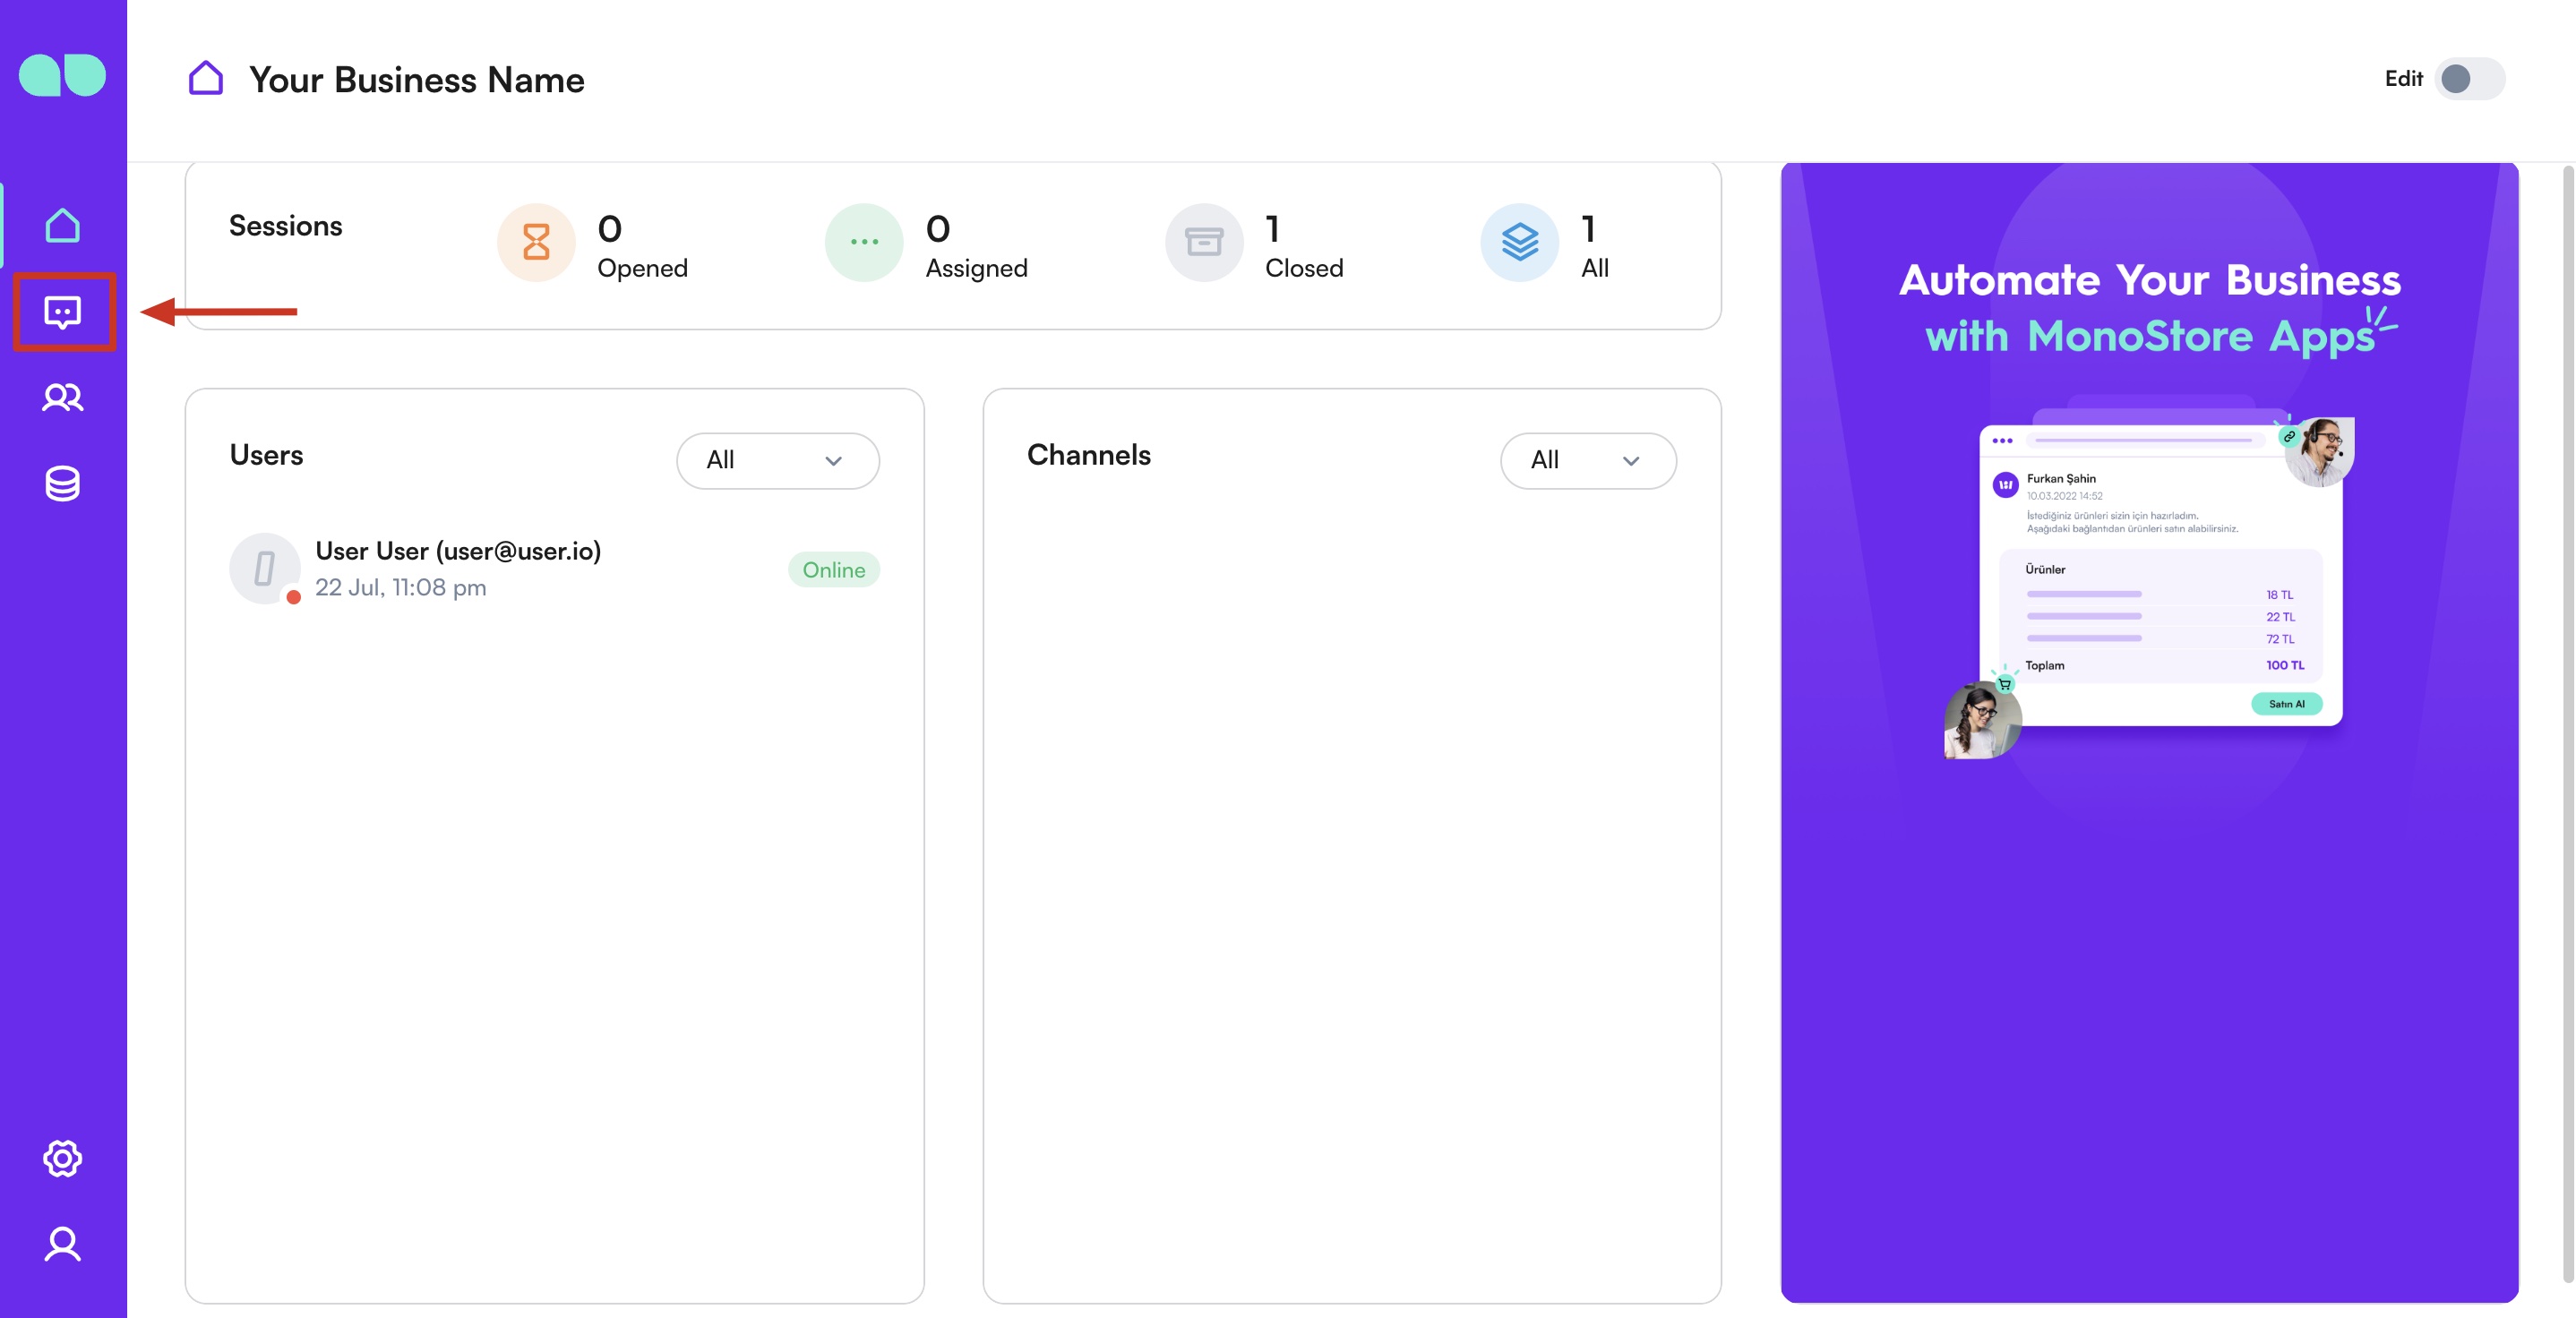
The Inbox module is the central hub where you can view all conversations with your contacts and interact with them when necessary. This feature is essential for managing customer interactions efficiently. Here’s how it works:
Accessing Your Inbox
To view and manage incoming messages from all your connected channels, start by selecting your tenant in the MonoChat interface. Then, navigate to the chat tab to access and manage your messaging features.
Receiving new messages
New messages will appear in the contact list of the Inbox module. New contacts will be unassigned by default.
- Opened: Opened and unassigned conversations are listed here.
- Assigned: Assigned and active conversations are listed here.
- Closed: Closed conversations are listed in here.
- All: All conversations are listed here based on their last action date.
Responding to Messages
Once you’ve accessed your inbox, you can start replying to messages.
Step 1: Select a session
Select a session from the list to view details such as the sender's information and conversation history, and to access the session input area.
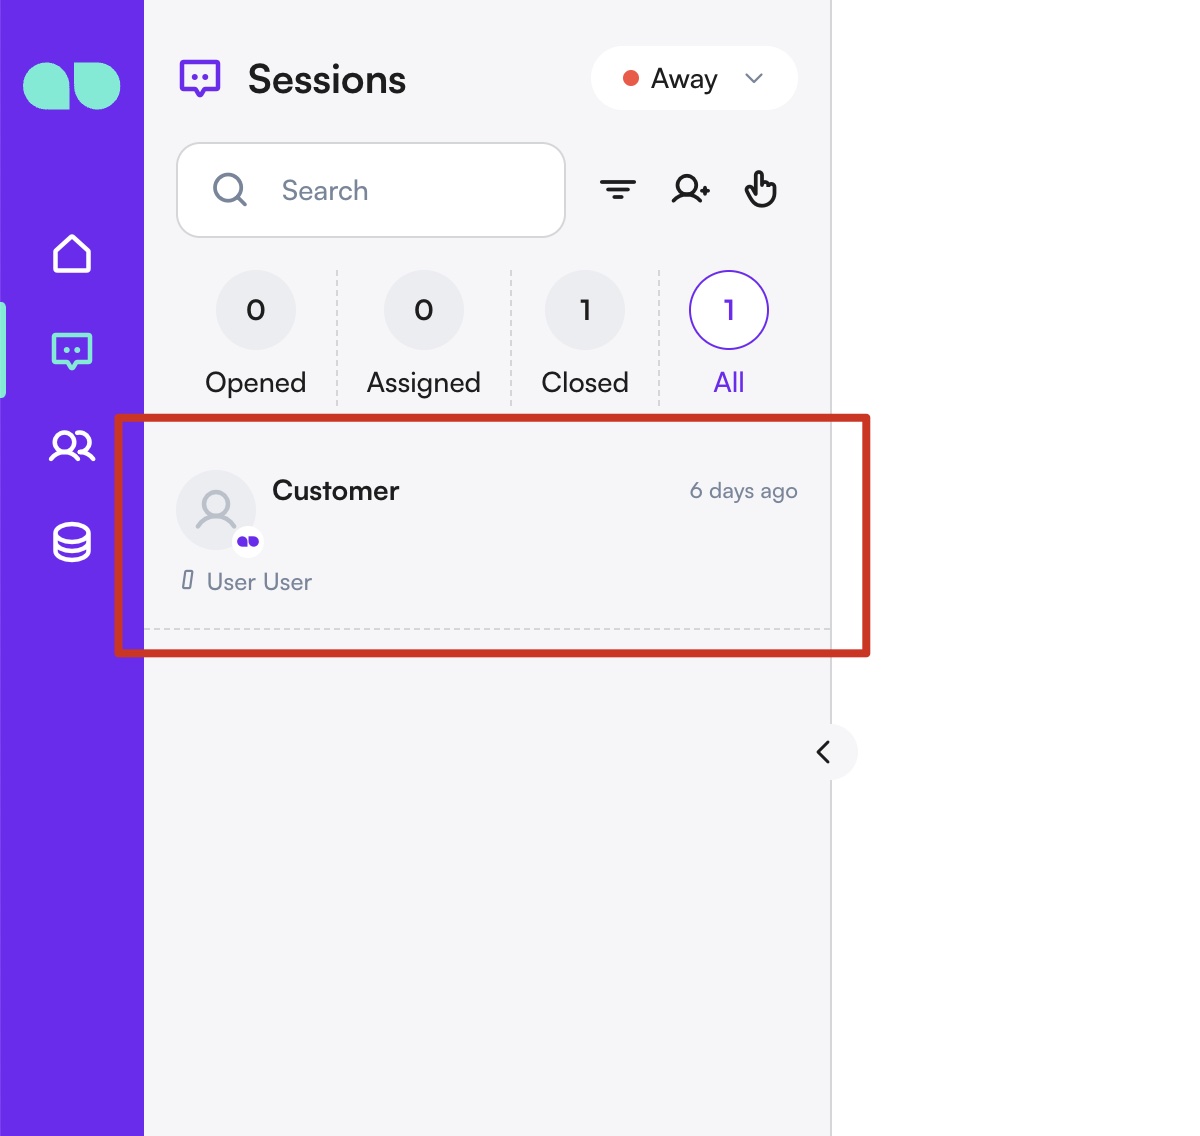
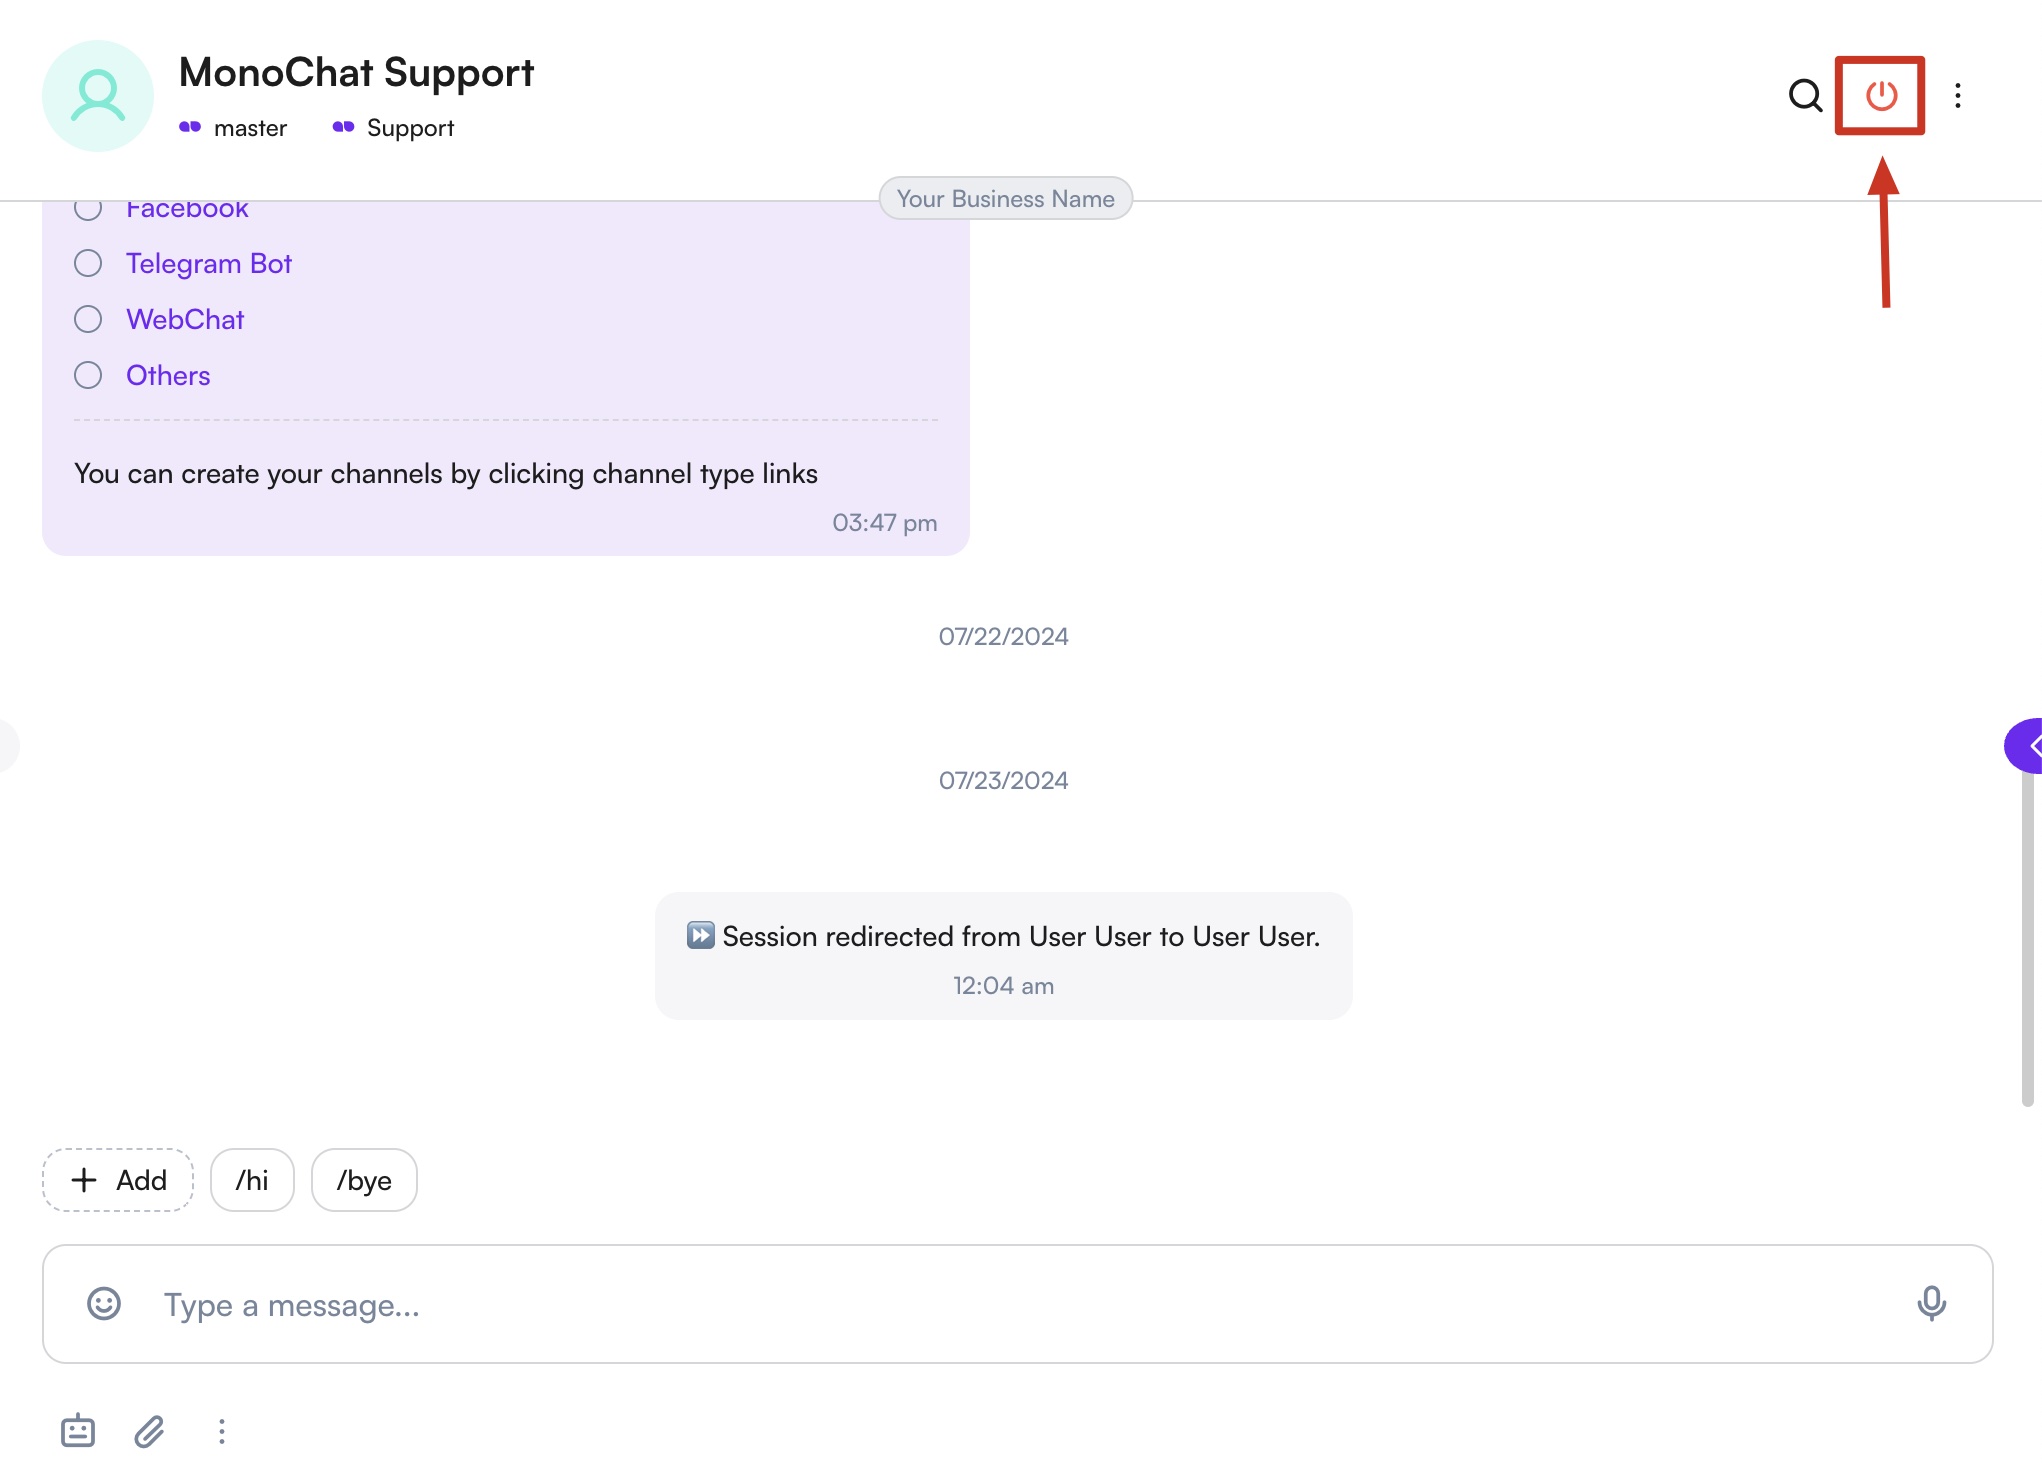
First session you ever see will be the MonoChat Support channel you can use to communicate with our Support Team.
Step 2: Compose your reply
Use the text input field to type your response. MonoChat also supports voice notes, rich media sharing, and quick replies with predefined templates to make responding easy and efficient.
Join the session if you haven't already!
Respond methods
Responding using text:
You can compose and send new messages from the text box below the conversation history window. Simply click the session input area, start typing and send.
Responding using voice:
Step 1: Click on microphone icon
You can click on the microphone icon in the session input area to start recording the voice note.
Step 2: Start recording
Once the recording starts, simply record a message. Also you can stop the recording and continue by clicking the pause and continue buttons.
Step 3: Click stop
When you are done, you can click on the stop button to end the recording.
Step 4: Send the message
You can play back the recording before sending it to the contact. If the recording is not suitable, you can delete and repeat the process.
For channels that support voice messaging, the recording will be sent as voice notes. If the channel does not support voice messaging, the recording will not be transmitted.
Responding using rich media:
You can send a rich media message to the person you are talking to using various methods:
Method 1: You can click on the upload button and choose the files they want to send.
Method 2: You can send files by copying them and pasting them into the session input area.
Method 3: You can hold and drag the files they want to send into the session input area.
For channels that support rich media, file size limits vary from channel to channel. If files exceed these limits, they will not be transmitted.
Make use of short messages
Short messages are pre-written templates or canned responses that make it easy to reply to contacts. To add a text message, simply click the Add button above the input area on the session field. The messages you add will appear in the same area, allowing you to quickly send them to your contacts by clicking on them.
You can see more information on terminating messages on Short Message Guide!
Step 3: Send your reply
Click the send button to deliver your response through the appropriate channel.
Terminating a Session
Ending a conversation properly is as important as starting one. Terminating a session ensures that interactions are wrapped up neatly and all necessary follow-ups are noted. Termination messages can be selected and customized as needed. Once you have resolved a contact's issue, terminate the conversation so the contact is no longer in the opened conversation queue. This reduces noise in your inbox.
When a conversation is terminated, the contact and their future conversations will remain assigned to the same user. If you need to refer to the contact or their conversation, search for them in the contacts module.
For more detailed information on handling short messages, please refer to our Message Termination Guide.
Step 1: Resolve the customer's query
Before closing a session, ensure that the customer's query has been fully resolved. Address all concerns and confirm with the customer that they are satisfied with the assistance provided.
Step 2: Terminate the session
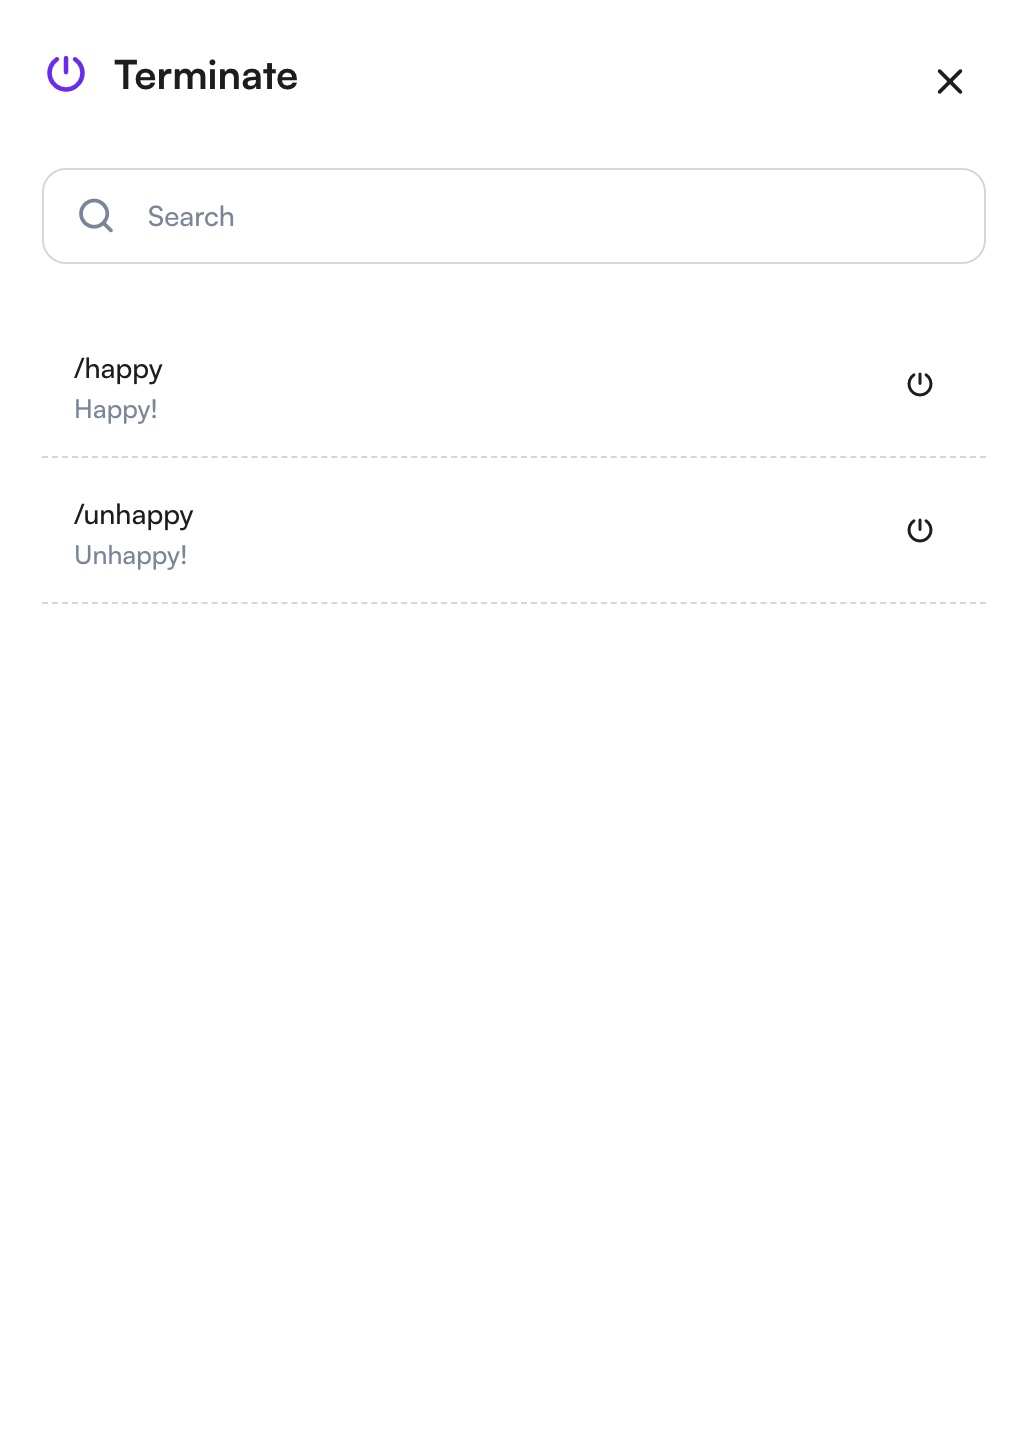
Once you determine the session is to be terminated, you can find the power icon to choose your termination message.
The termination messages you created are listed here, along with MonoChat's predetermined options. Confirm the action by pressing the power icon, and you will successfully terminate the session.
For more detailed information on handling termination messages, please refer to our Termination Messages Guide.
Assigning contacts
A contact can be assigned to a user via two methods: Auto-assignment via workflows and manual assignment.
Assigning a contact to a user is important to ensure that your teammates know who is responsible for responding to the contact.
Manual assignment
The Assignment dropdown list is located at the top right corner of the inbox module. It can be used to assign or reassign a user to a contact. The dropdown lists all available users and workgroups, and you can also search for a specific user using the search box.
Automatic assignment
Automatic assignments can be set up using the workflows module. Workflows help you reduce manual work by automating processes. Learn more about Flow Management Guide!
Session Filtering
Session Filtering allows you to quickly narrow down conversations in your inbox based on various criteria. When message volume is high, filtering makes it easier to locate the right sessions and manage customer requests more efficiently.
Accessing Session Filters
To access the filtering options, click on the filter button located above the session list in the Inbox module.
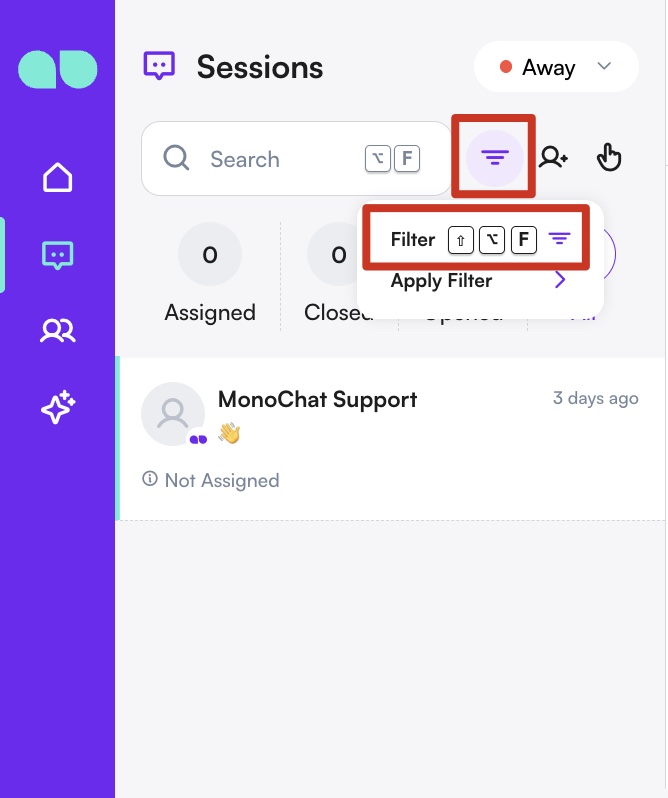
When the filter panel opens, you can select one or multiple criteria to refine your session list. All selected filters will be applied simultaneously.
Available Filters
MonoChat allows you to filter sessions using the following categories:
Channels
Filter sessions based on the channel they were received from.
Examples: WhatsApp, Instagram, Messenger, WebChat.
Users
View only the sessions assigned to specific users.
This is especially useful for tracking workload or reviewing team activity.
Workgroups
Filter sessions by the workgroup responsible for them.
Examples: Support Team, Sales Team, Operations Team.
CRM Data
Filter sessions using CRM fields stored in the contact profile.
This is ideal for segmenting sessions based on customer type, source, category, or other CRM attributes.
Other Filters
Additional advanced filters help you manage sessions with more precision:
Created At
Filter sessions based on the date range when they were created.
Last Message Date
Filter sessions by the date of the last incoming or outgoing message.
This helps you identify inactive sessions or sessions that were recently updated.
Session Types
Filter sessions by their type.
Examples include:
- Bot
- Bulk
- Comment
- Flow
- Poll
- Spam
Applying and Clearing Filters
After selecting your filter criteria, your session list will automatically update to show only the matching conversations after you click the Update button.
To remove all applied filters, click the Clear Filters button at the bottom of the panel.
Conversations
What is a conversation?
In the context of the platform, an interaction between a contact and the platform is referred to as a conversation. Conversations help organize communication within a specific context. A contact can have multiple conversations with the platform, but only one conversation can be open at a time.
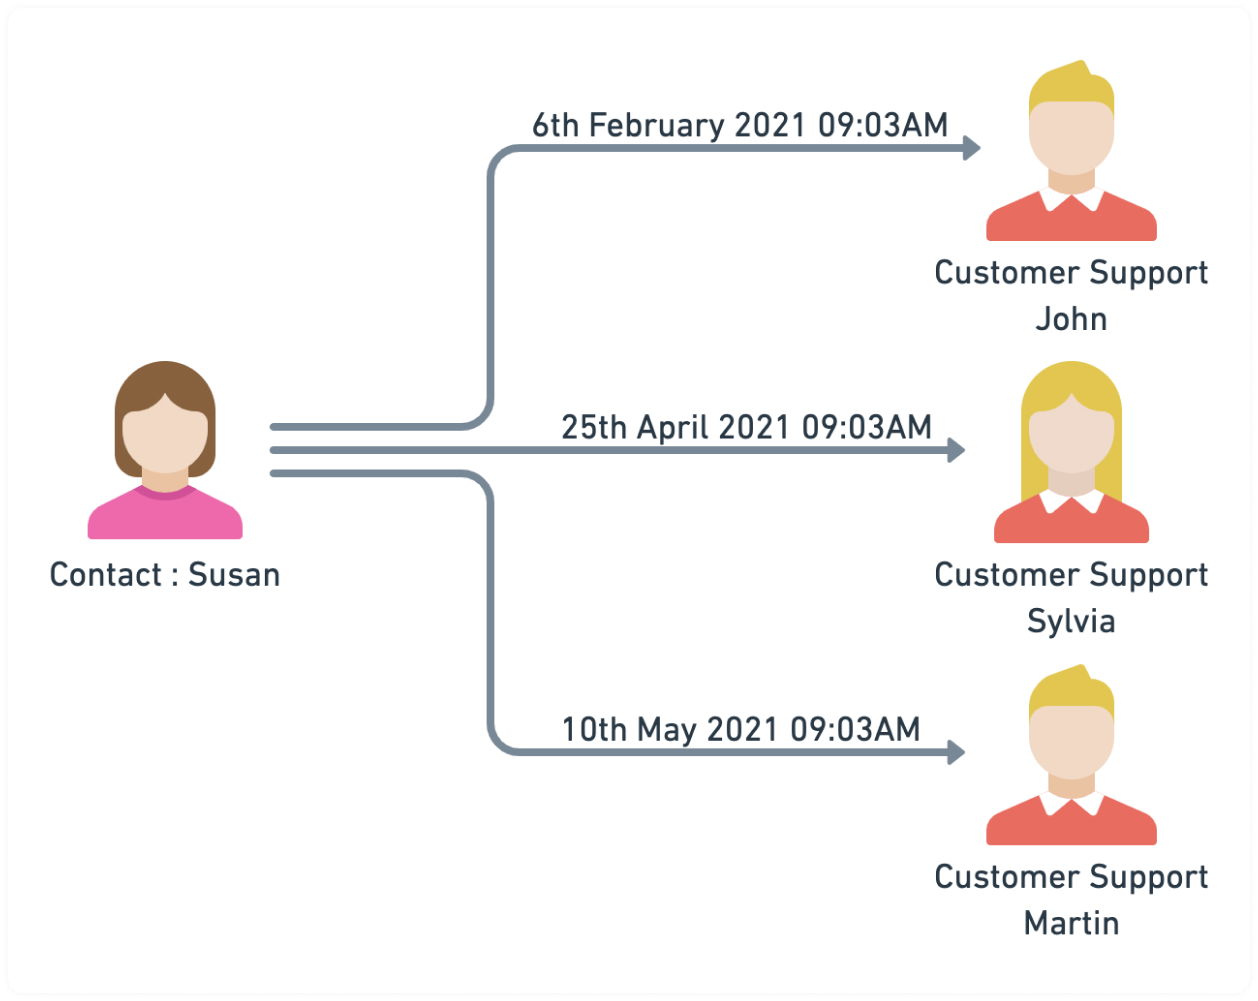
Using the above example, Susan contacted the platform for various reasons at different times. She engaged in three separate conversations with different users on the platform. Each conversation has its own unique context and specific issue that needs to be addressed by the customer support team.
Starting a conversation
Conversations can be initiated through the following methods:
Method 1: New incoming message from contact
When a contact with no open conversation sends a message to the platform, a new conversation will be created for this contact. This also applies to new messages from new contacts.
Method 2: User
You can manually start a conversation from the inbox module.
Method 3: Automation
An automation rule can be set up with the "Start Conversation" action, which will create a new conversation for the triggering contact.
Session Widgets
On the right side of the session field, you'll find your session widgets. These widgets allow you to perform quick actions, enter information about the person you're communicating with, and take notes. They provide convenient tools and options to manage your interaction efficiently without navigating away from the current screen.
Profile information
In this field, you can save and manage the profile information of the person you're interacting with. This includes details like contact information, preferences, and any other relevant data. You can customize how this information is displayed to suit your business needs through the settings section.
Tags
Tags are keywords or categories that you can attach to conversations to help organize and categorize them. By tagging conversations, you can quickly record relevant details about the individuals you're communicating with, making it easier to recall important information in future interactions. Tags also enable you to search and filter contacts effectively within your CRM system.
Notes
The Notes Widget allows you to add detailed notes about the person you're speaking with. You can write descriptions and key points about your interactions. These notes are accessible to you and other users in future conversations, helping to provide context and continuity in your interactions with the same person.
Billing
The Billing Widget provides an overview of the financial status of the person you're talking to, related to your business. It lets you view balances, track transactions, and create new payment links. This tool is crucial for managing and monitoring financial interactions with your contacts.
Gallery
The Gallery Widget displays all the images sent and received during your conversations. It also allows you to upload and share documents of any file type from the File Box. This feature helps you keep track of visual and document-related content exchanged in your conversations.