Channels
The Channels feature allows businesses to connect and manage various messaging platforms such as WhatsApp Business API, Facebook Messenger, Instagram, TikTok, Telegram Bot, and WebChat. Businesses can add multiple instances of the same type of channel, enabling them to send and receive messages through these platforms seamlessly.
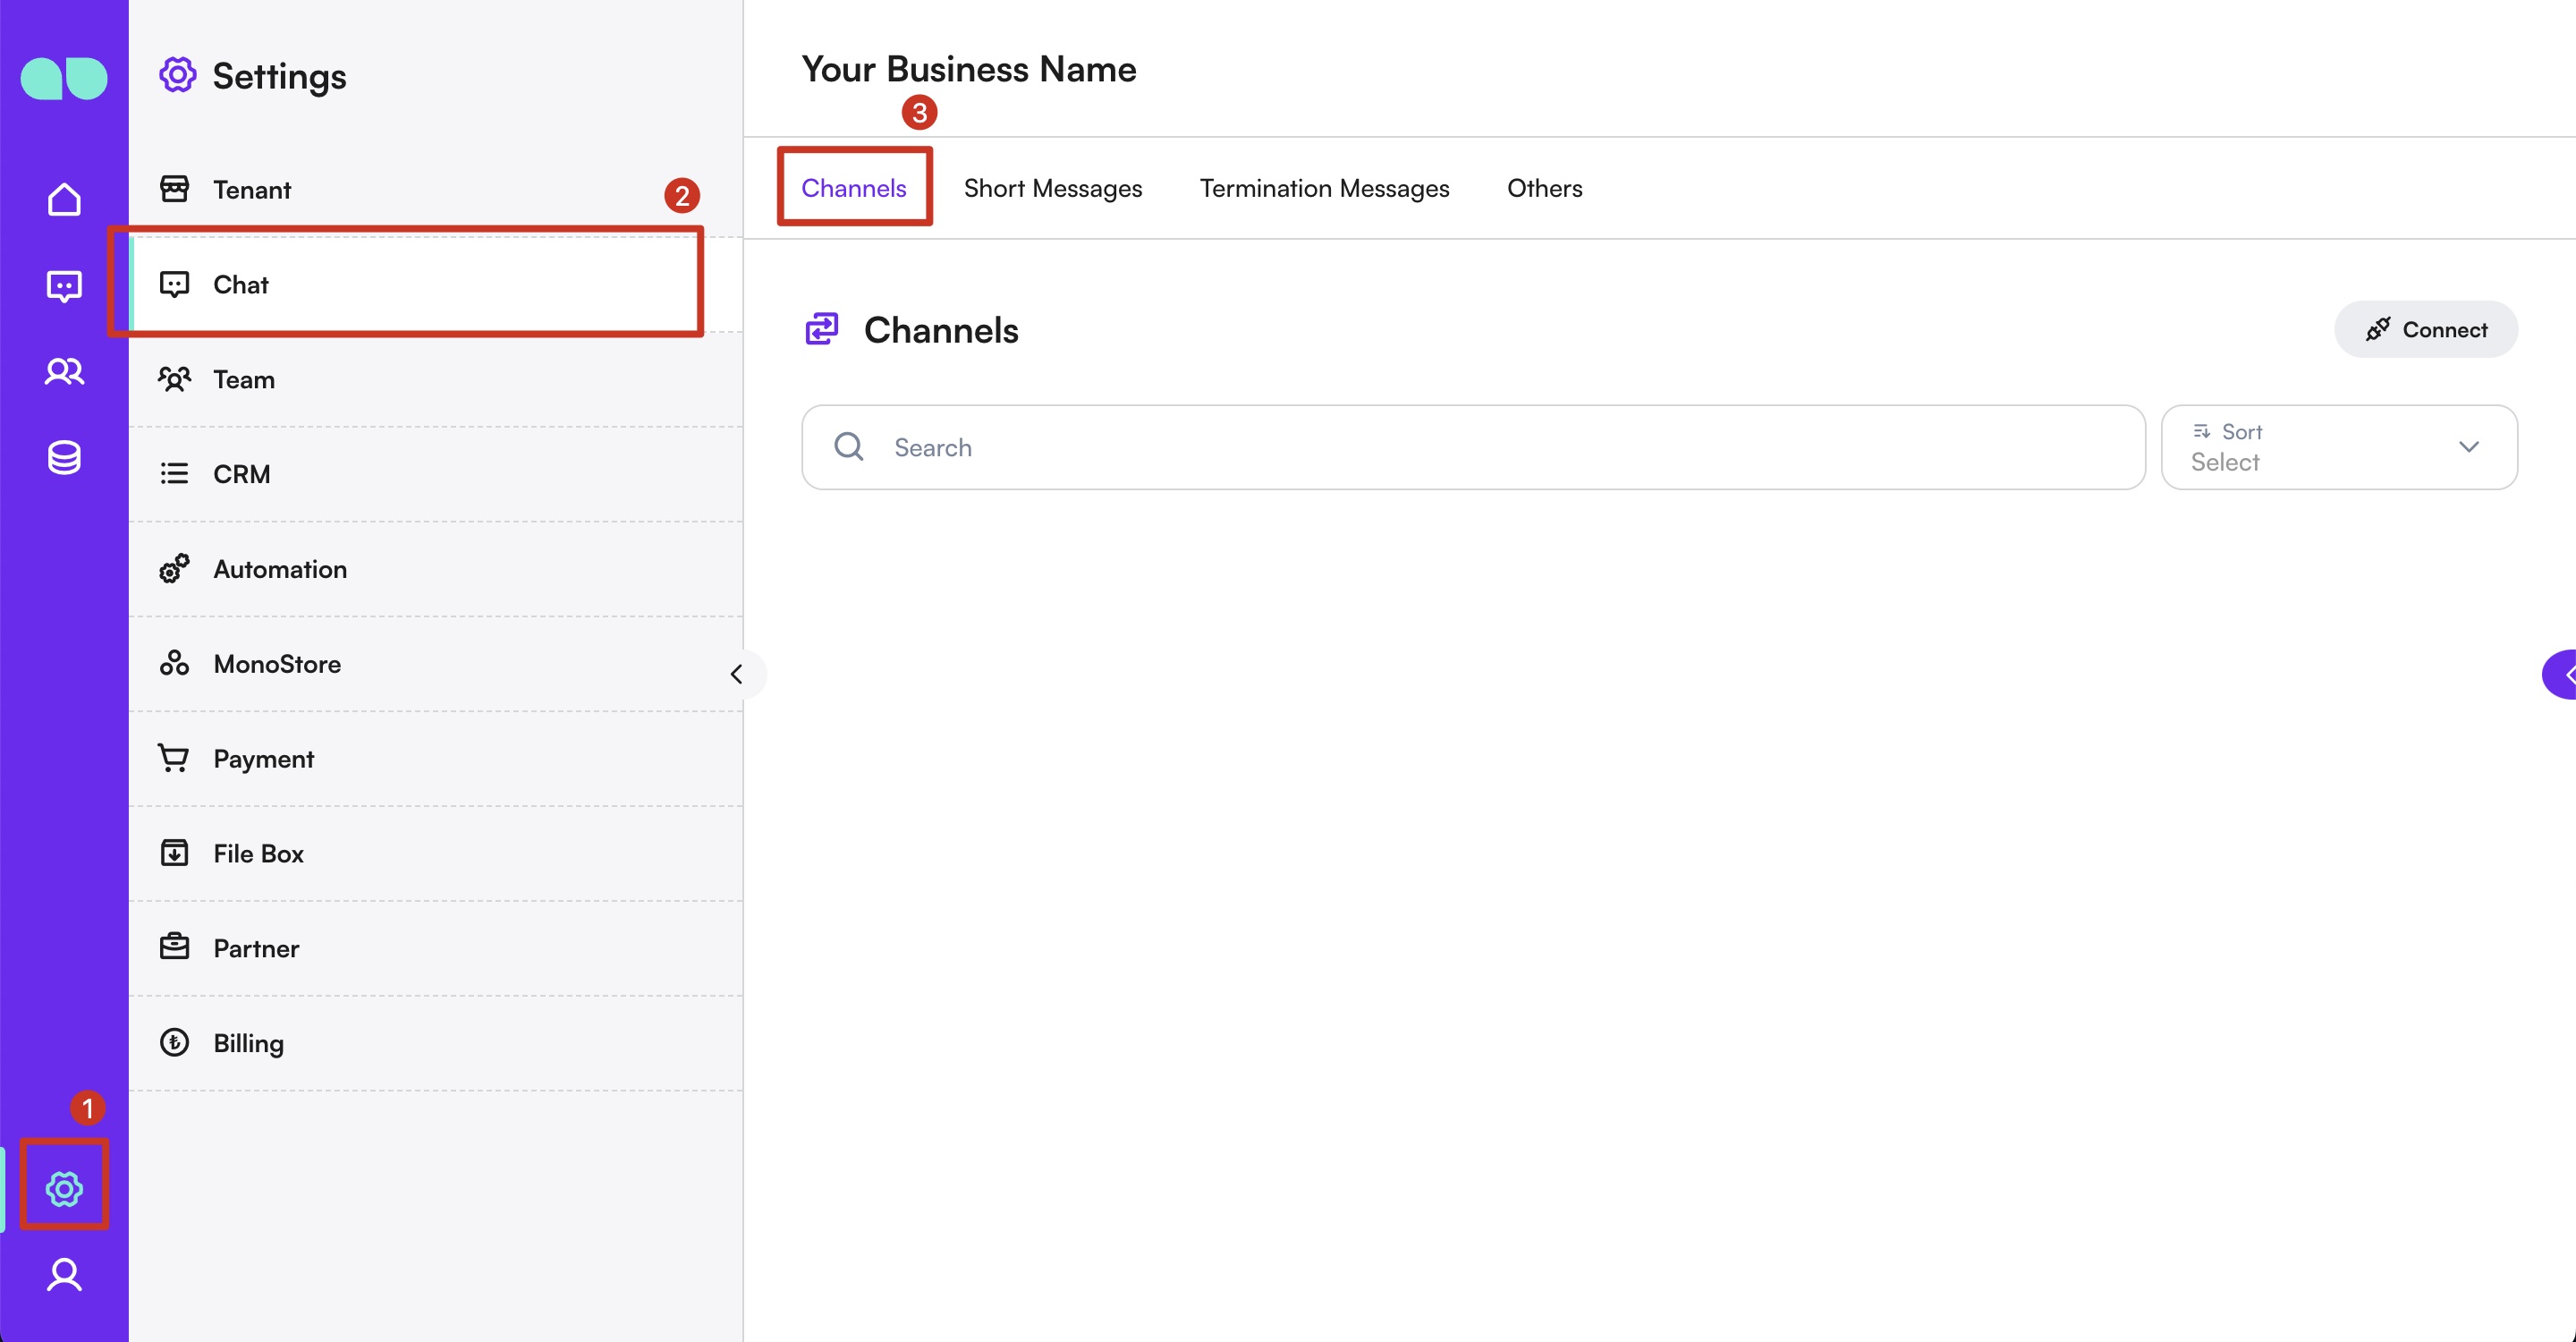
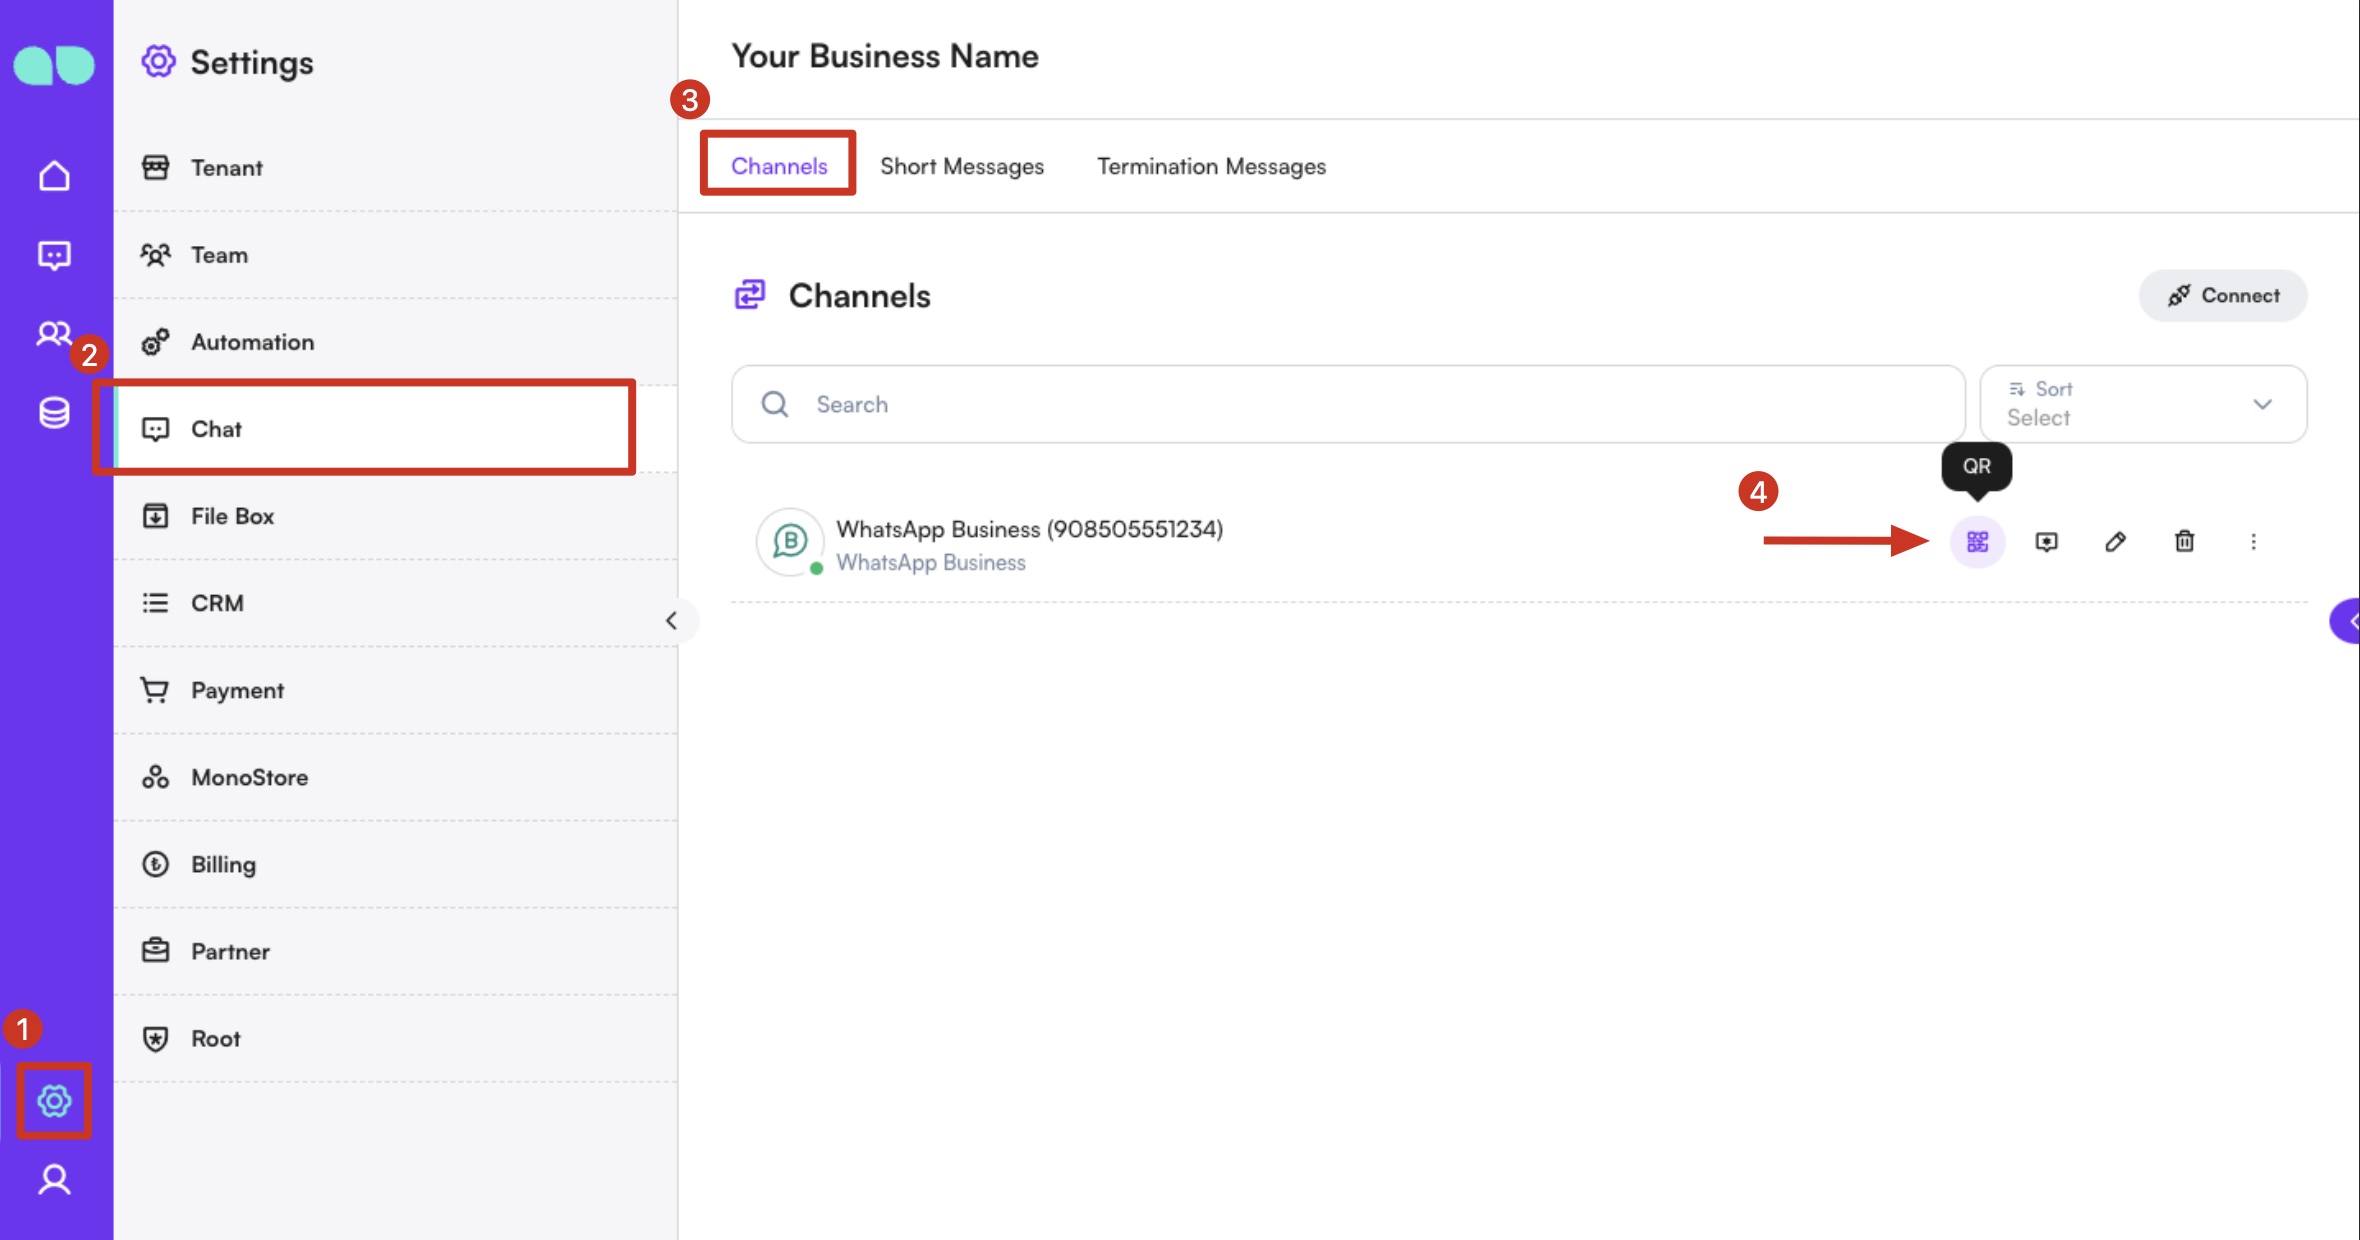
Accessing Channels
- Navigate to the
Settingssection from the sidebar. - Click on
Chatunder theSettingsmenu. - Select the
Channelstab.
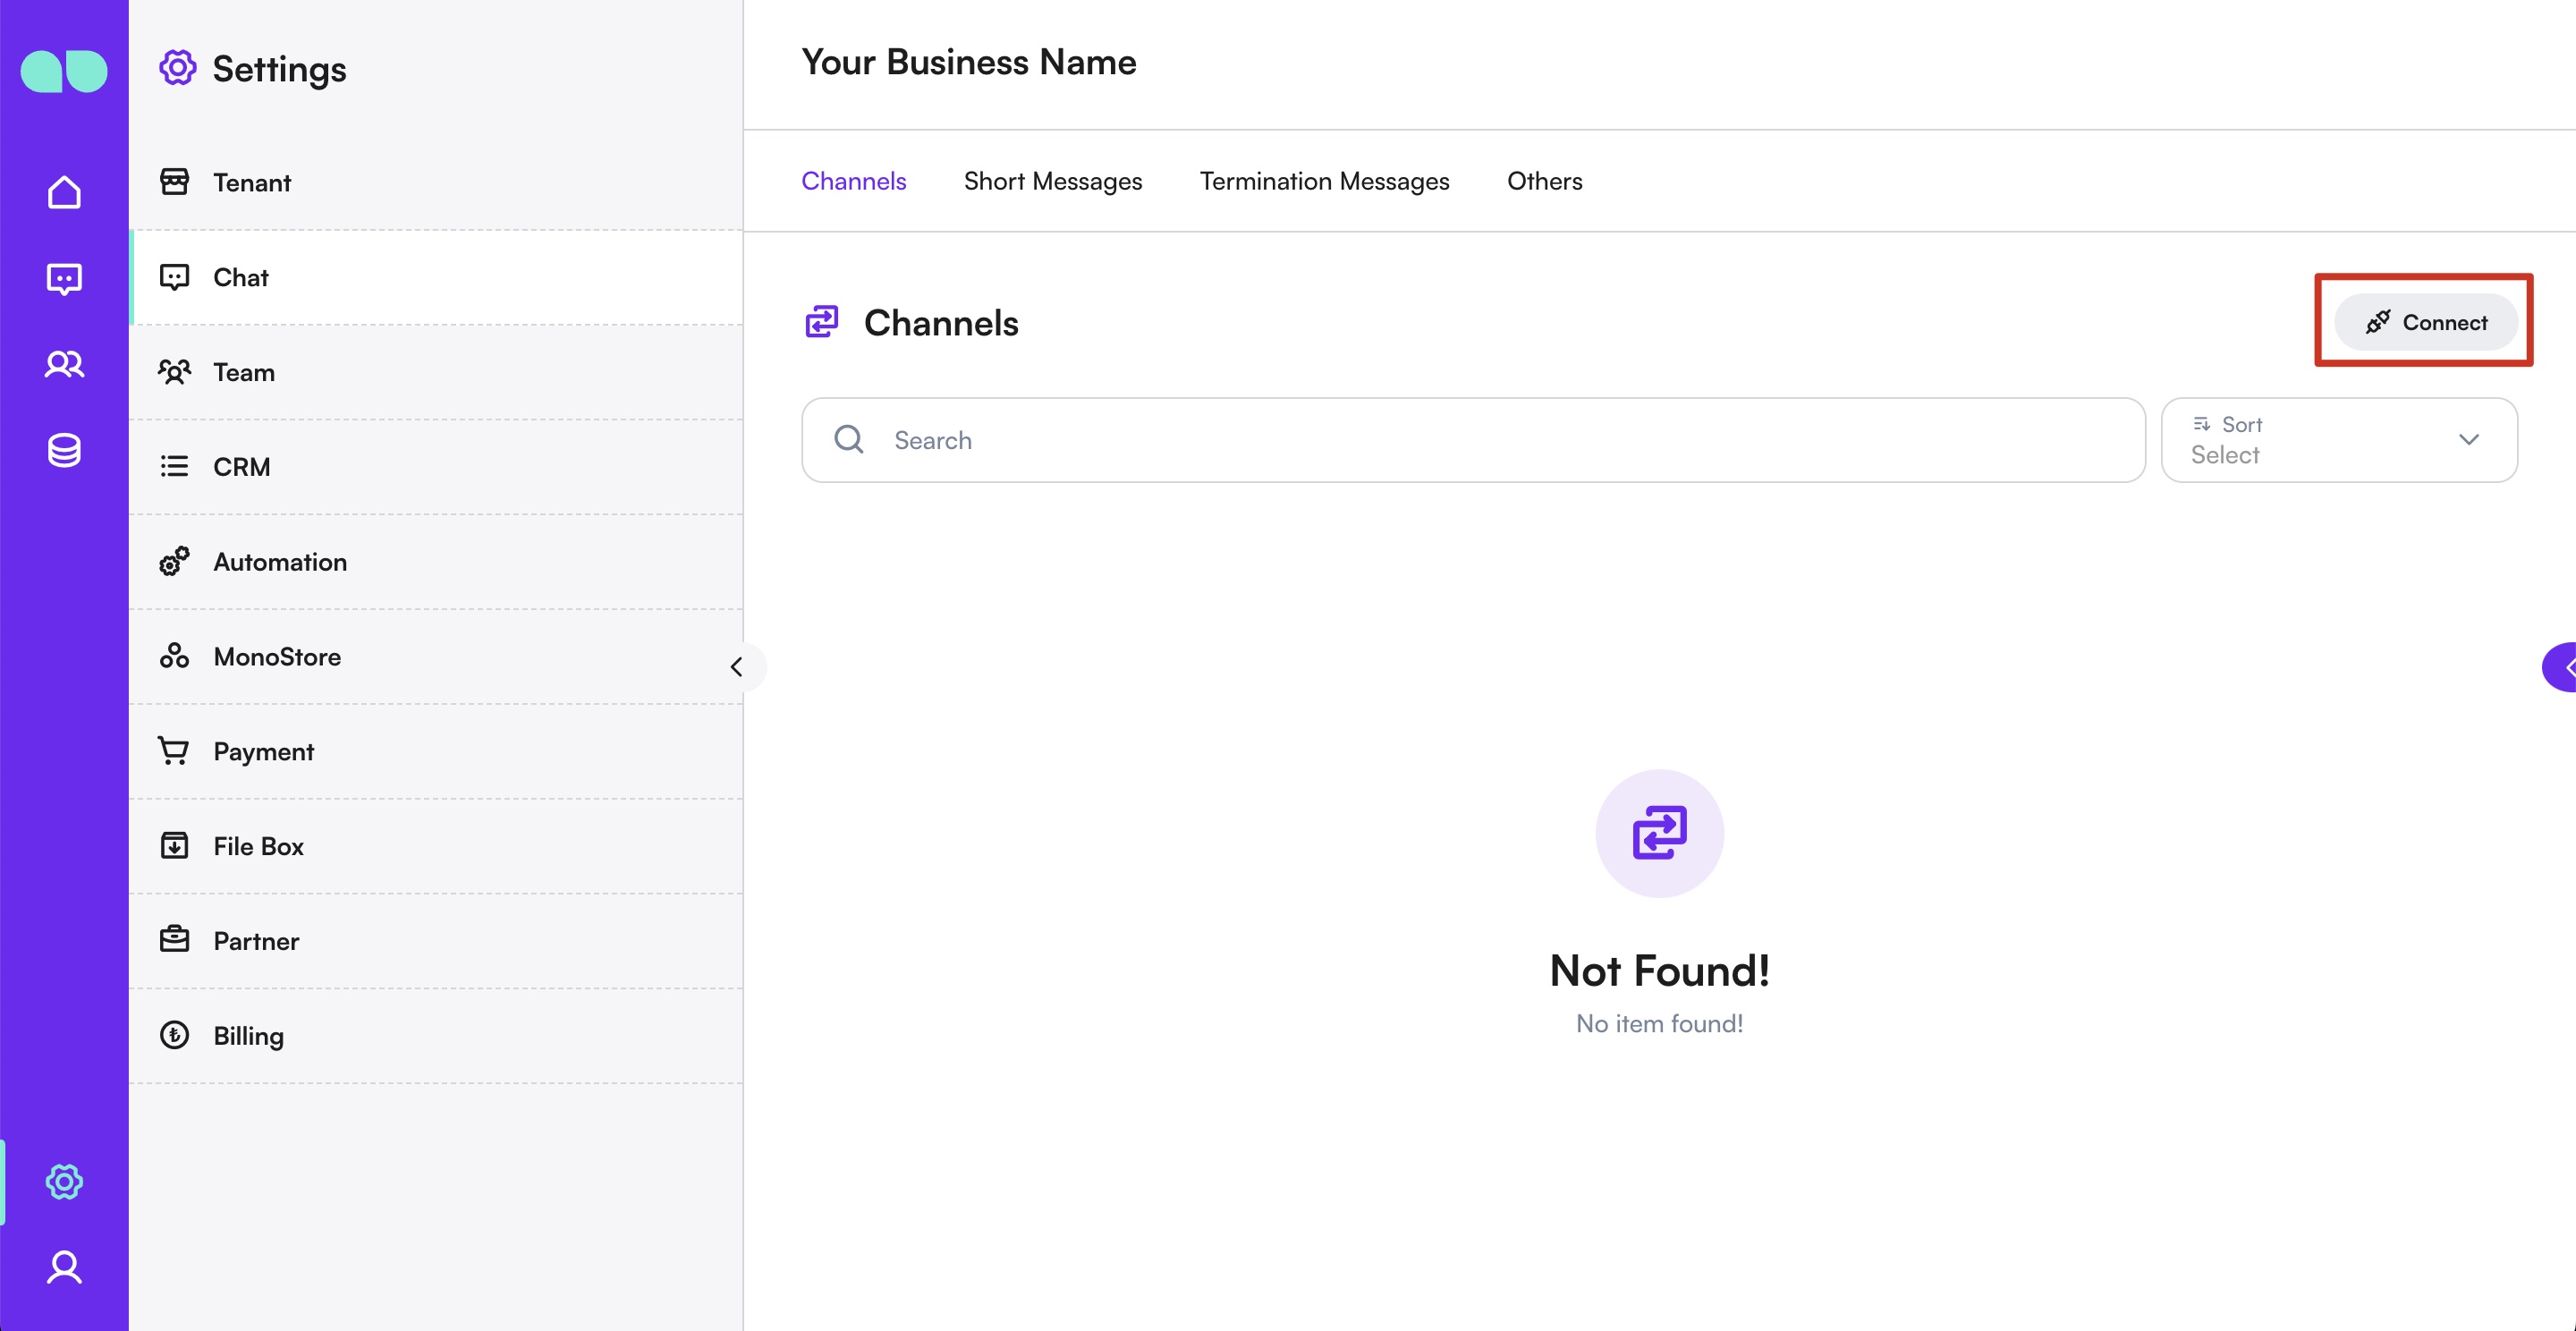
Adding a Channel
- Click the
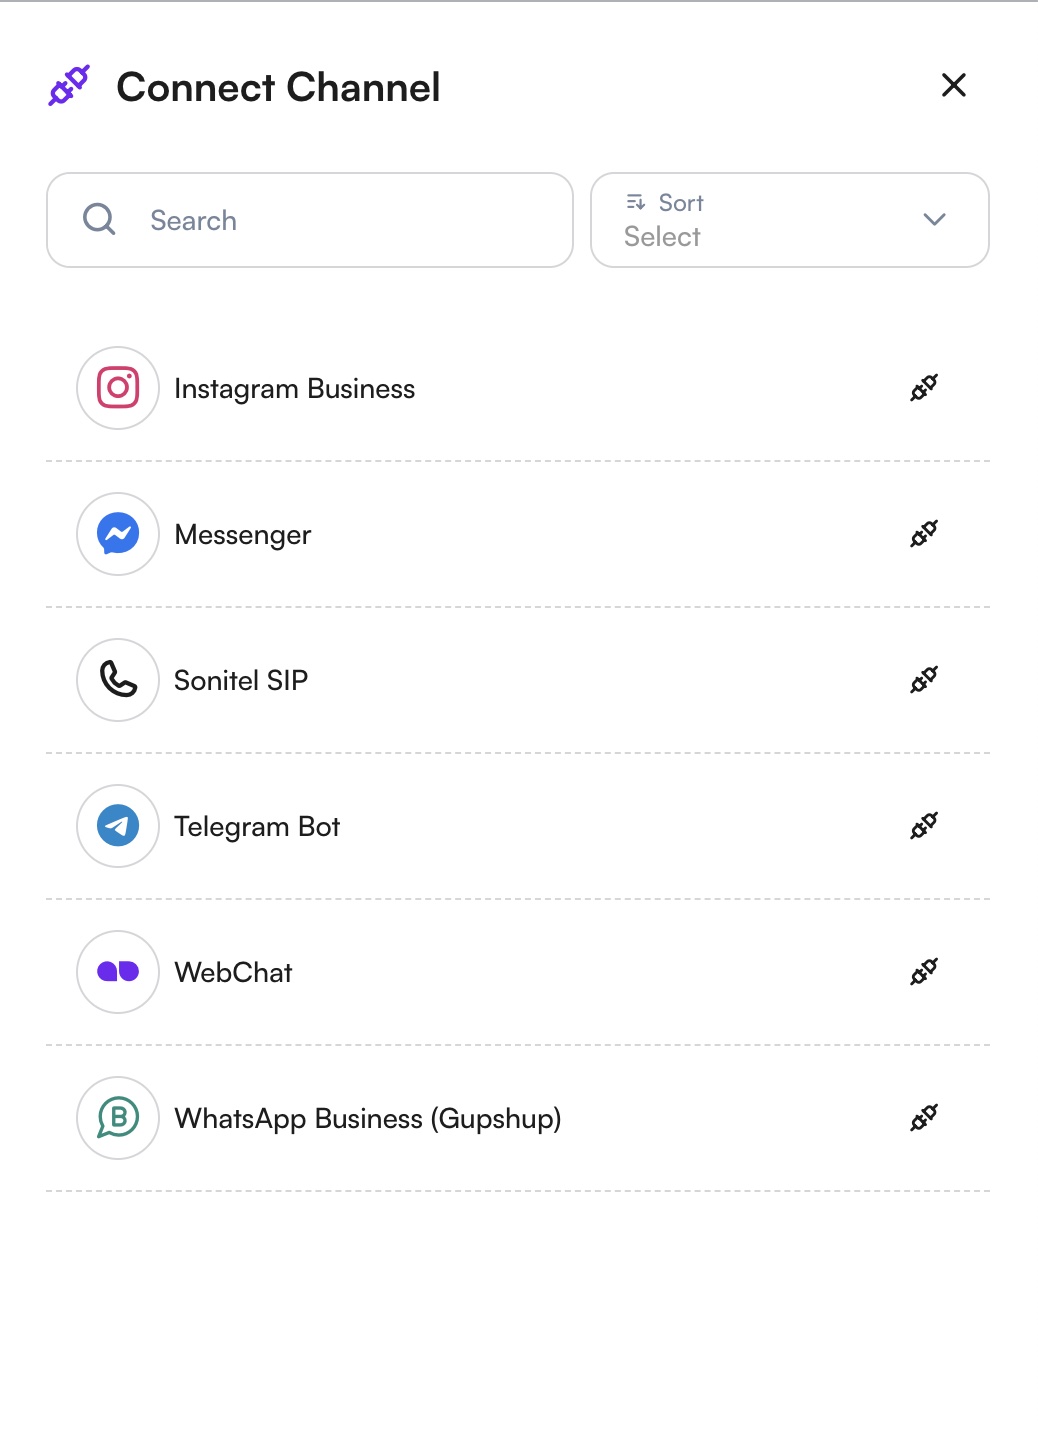
Connectbutton on the right-hand side. - A list of available channel types will appear.
- Select the type of channel you wish to add (e.g., WhatsApp Business API, Facebook Messenger, Instagram, Telegram Bot, WebChat).
- Complete the related steps according to the selected channel type.
WhatsApp Business API
WhatsApp Coexistence Support (New)
MonoChat now supports WhatsApp Coexistence.
With this feature, businesses can use the same WhatsApp phone number on both the WhatsApp Business App and WhatsApp Business API (Cloud) at the same time.
With Coexistence:
- Teams can continue handling manual conversations via the WhatsApp Business App
- Automations, notifications, and integrations run through Cloud API
- There is no need to delete or migrate away from the WhatsApp Business App
Note: WhatsApp Coexistence is available only for eligible accounts and phone numbers supported by Meta.
Create A New WhatsApp Business API (Cloud)
- Select
WhatsApp Business API (Cloud)from the list. - Read the service agreement by scrolling all the way to the bottom of the drawer. Once the confirmation checkboxes appear, mark all required checkboxes.
- Click Continue to proceed.
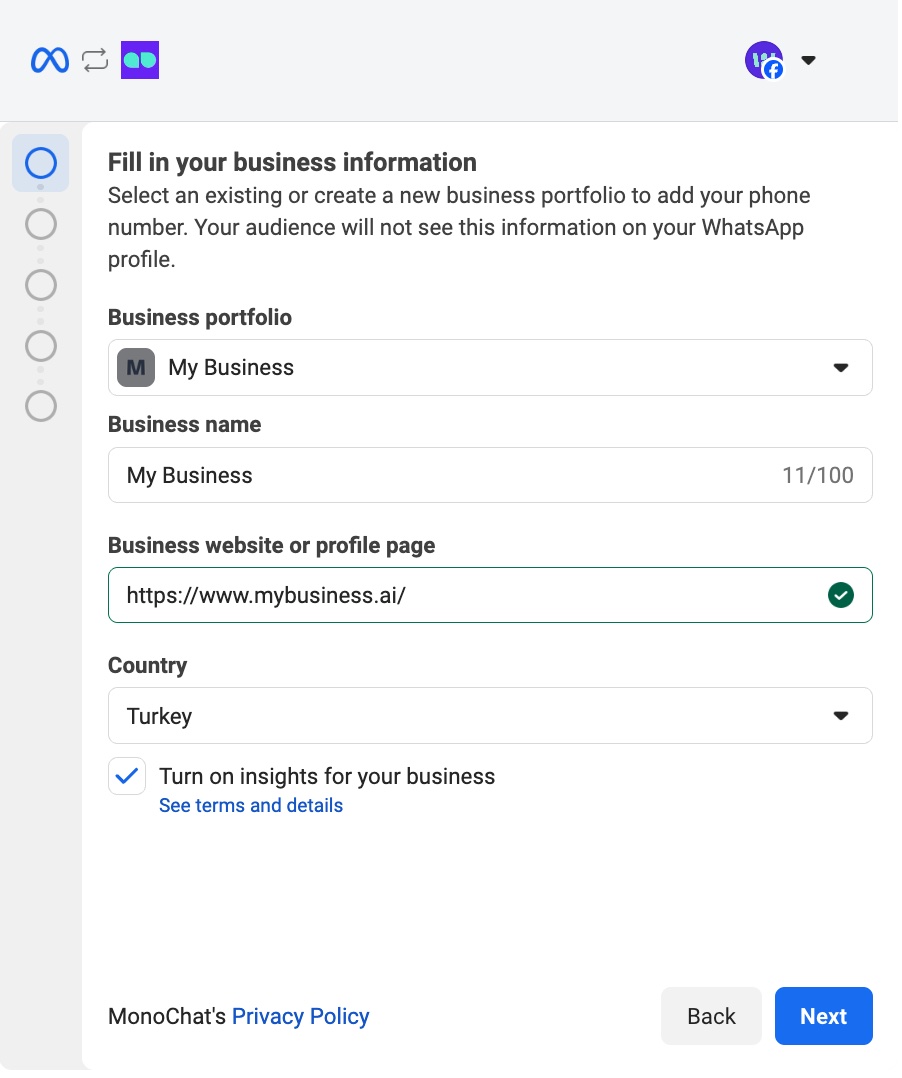
- Choose the country of your business.
- This selection determines the data storage region, which defines where your message data is stored at rest. Selecting the appropriate region helps ensure local data protection compliance and provides better localization for your WhatsApp message data.
- Click Connect New Number to proceed.
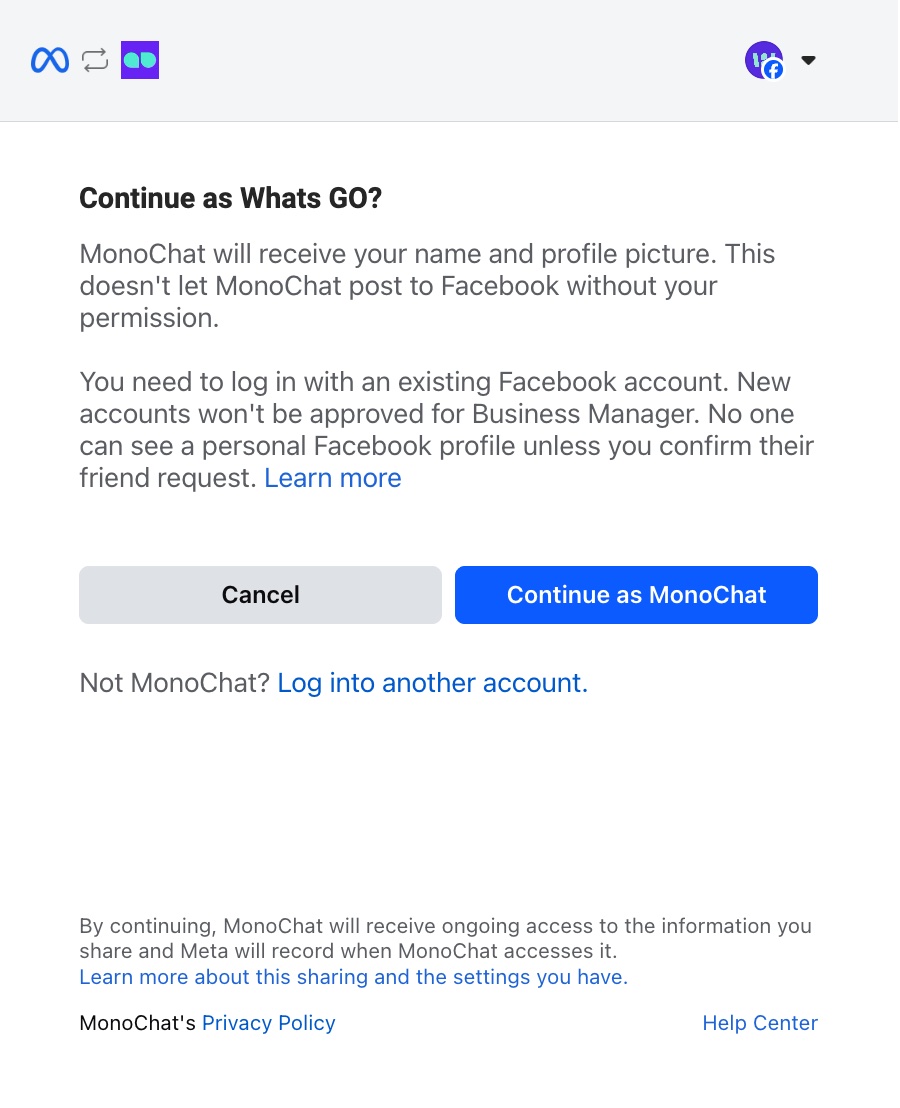
- A Facebook (Meta) login popup will appear.
- Select the Facebook account you want to continue with.
- If you are not logged in, enter your credentials to proceed.
- Click Get Started on the Meta screen.
- This step allows MonoChat to access your WhatsApp Business account.
- Meta will display the permissions MonoChat requires, such as managing phone numbers, creating templates, sending/receiving messages, assigning users, and accessing metrics.
- By continuing, you confirm that you agree to the WhatsApp Business Terms of Service, Meta Terms of Service, and Business Tools Terms of Service.
- Select the Business Account you want to connect the phone number to.
- Choose the appropriate WhatsApp-enabled business from the list of accounts you have access to.
- Click Continue to proceed.
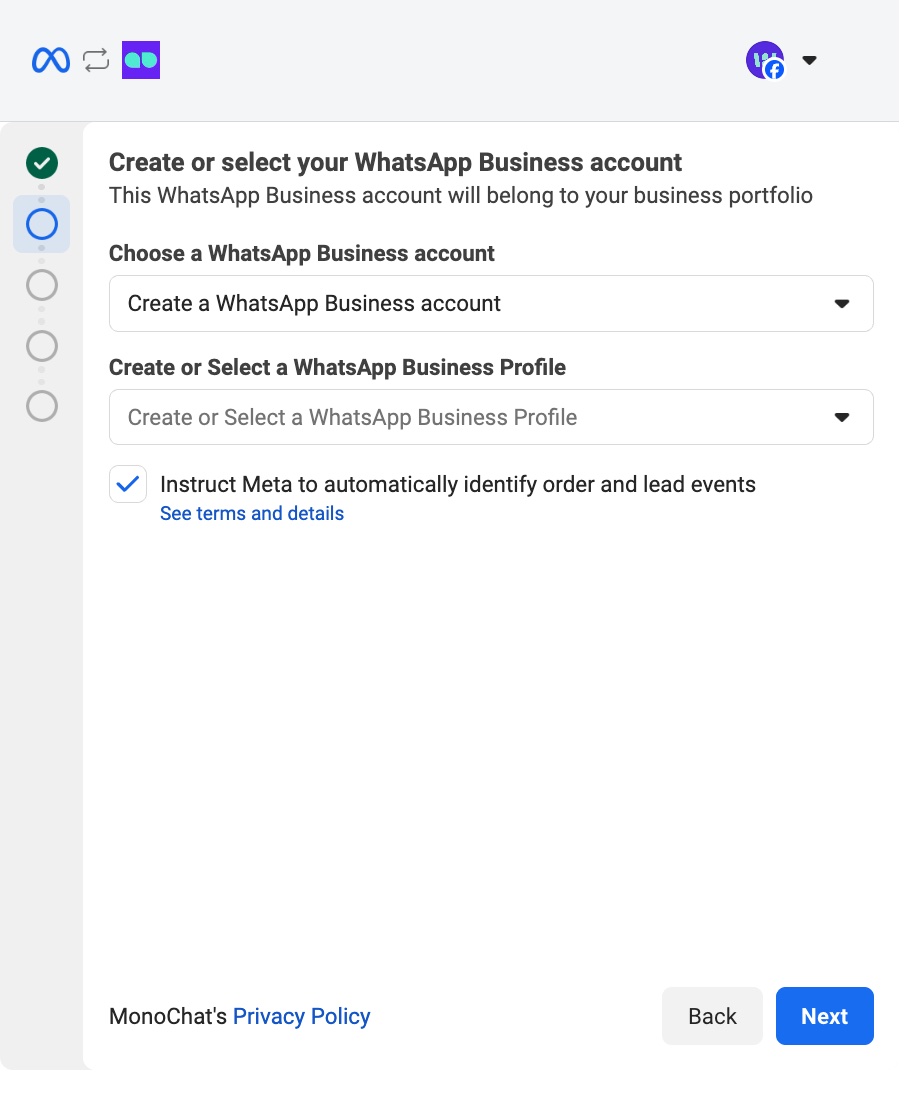
- Create your WhatsApp Business Account and WhatsApp Business Profile.
- Make sure both Create WhatsApp Business Account and Create WhatsApp Business Profile options are selected.
- If you want to use WhatsApp Coexistence:
- Select Connect a WhatsApp Business App at this step.
- This option allows you to connect an existing WhatsApp Business App phone number with Cloud API.
- Follow the on-screen instructions provided by Meta to complete the setup.
Info:
When Coexistence is enabled, your WhatsApp Business App remains active while MonoChat connects the same phone number via Cloud API.
If you already have a WhatsApp Business Account and Profile previously onboarded via Cloud API, you can simply select them and continue instead of creating new ones.
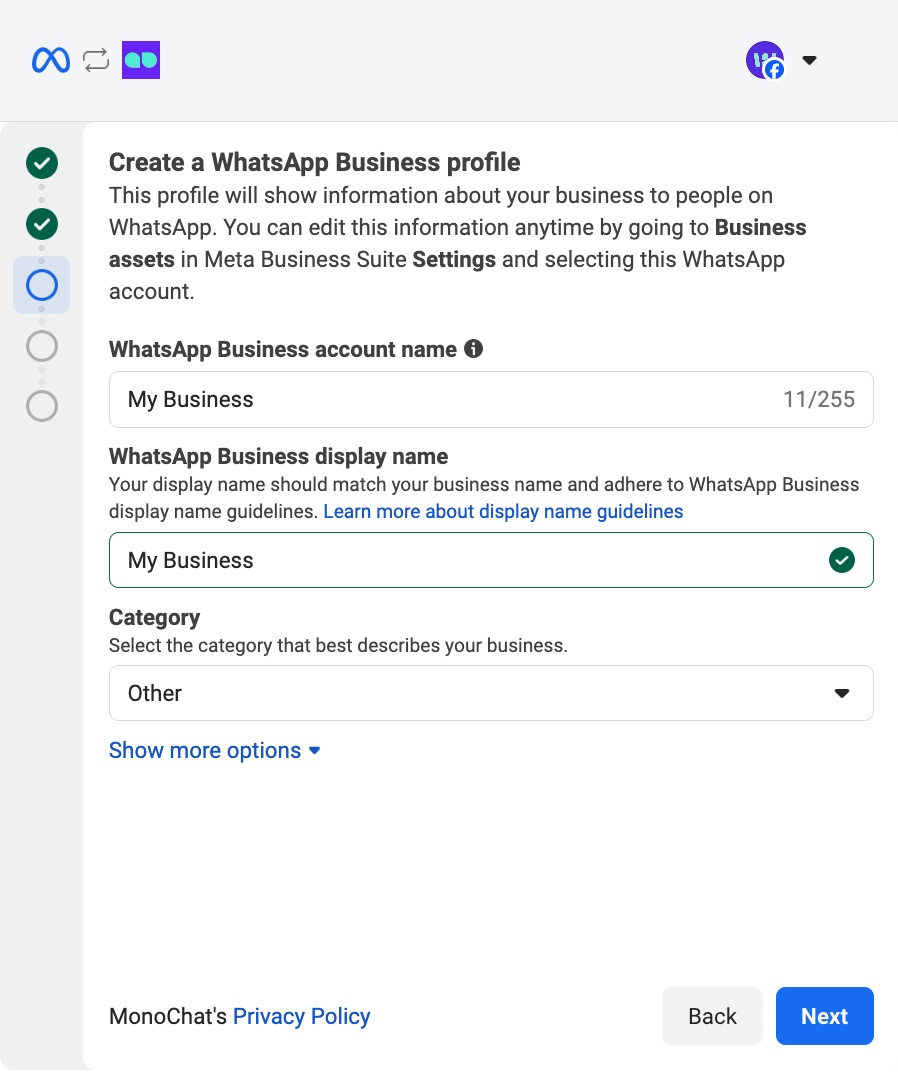
- Create your WhatsApp Business Profile.
- Enter your WhatsApp Business Account Name and Display Name.
- Select the appropriate Business Category for your company.
- This profile information will be visible to users on WhatsApp. You can update it anytime from Meta Business Suite → Business Assets → WhatsApp Accounts.
- Add your WhatsApp phone number.
- Click Add New Number and enter the phone number you want to connect.
- Choose your preferred verification method:
- Text Message
- Phone Call (recommended if you are using a landline number)
- A 6-digit verification code will be sent based on the method you select, and you will enter this code in the next step.
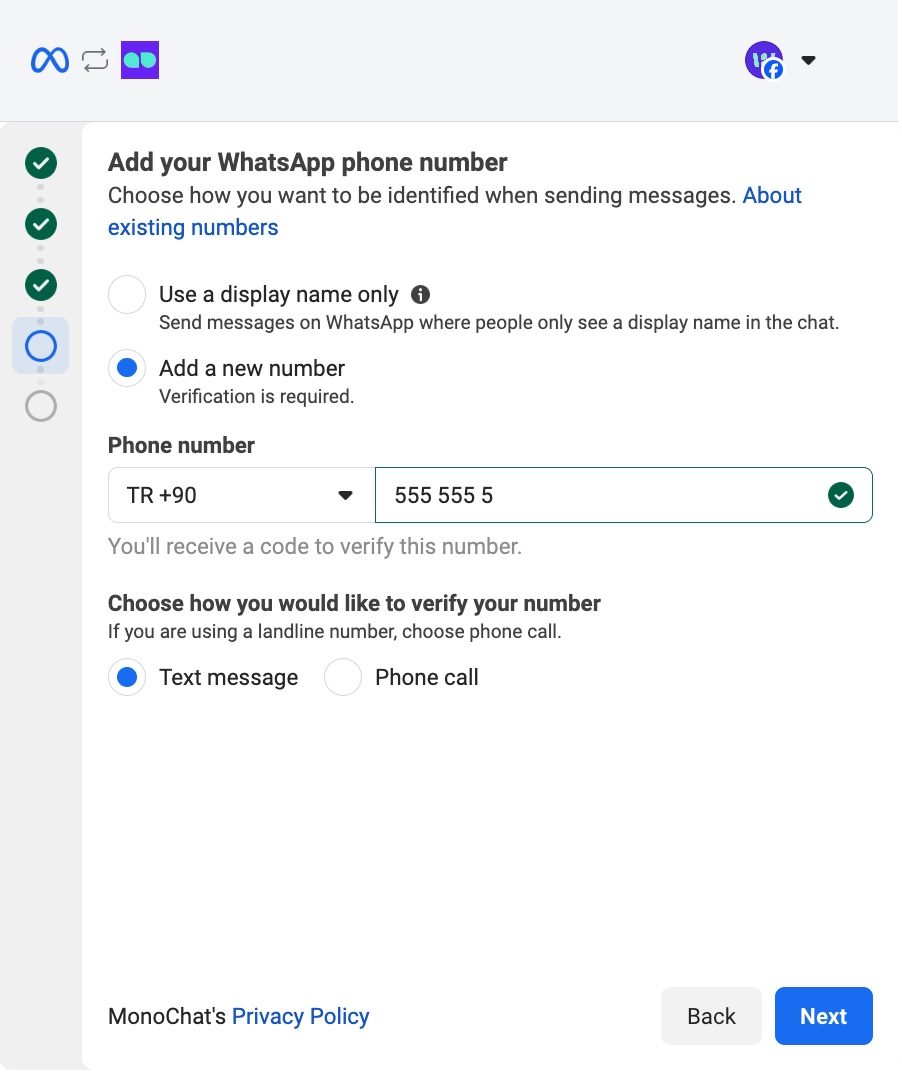
The phone number you enter must not be associated with an existing WhatsApp or WhatsApp Business account.
If the number is already in use, the WhatsApp account must be removed before proceeding.
-
Enter the 6-digit verification code and complete the setup.
- After entering the code, click Finish to finalize the process.
- Once completed, your phone number will be automatically connected to MonoChat.
If you encounter any errors during any of the steps above, you can contact our support team via WhatsApp for assistance:
Create A New WhatsApp Business API (Gupshup)
- Select
WhatsApp Business API (Gupshup)from the list. - Fill in the necessary details: phone number, APP ID, APP Name, and WAB API Key (for Gupshup).
- Click
Saveto add the channel.
Instagram Business
- Select
Instagram Businessfrom the list. - In the drawer, click Connect with Facebook.
- This will open a Meta (Facebook) login popup to continue the connection.
- If the popup does not appear, check your browser's popup blocker and allow popups for the MonoChat domain.
- In the Meta popup, you will see the screen titled “Connect your account to MonoChat.”
- If the currently logged-in Facebook account is correct, simply click Continue to proceed.
- If it is not the correct account, click Switch Account and log in with the appropriate Facebook account before continuing.
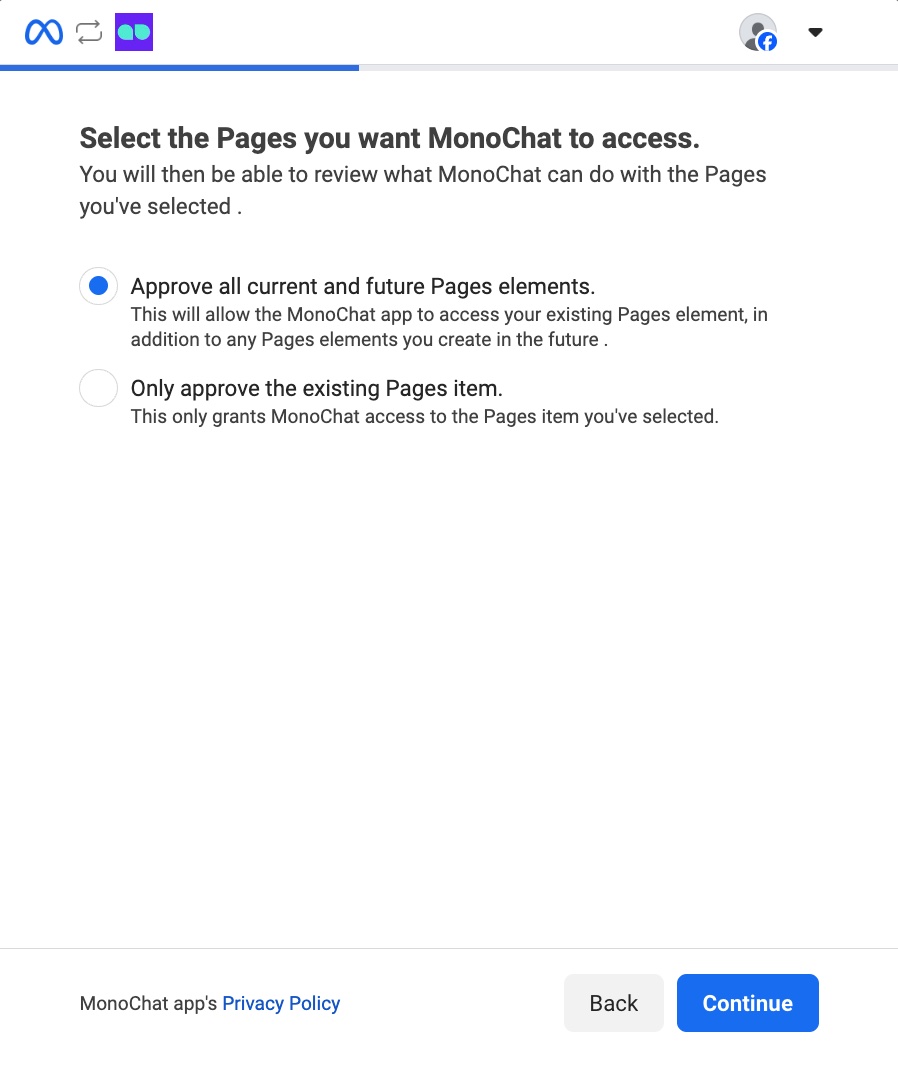
- Select the Facebook Pages you want MonoChat to access.
- Approve all current and future Pages: This grants MonoChat access to your existing Pages as well as any Pages you create in the future.
- Approve only the selected Page: This option limits access to only the specific Page you choose.
After selecting the appropriate option, click Next to continue.
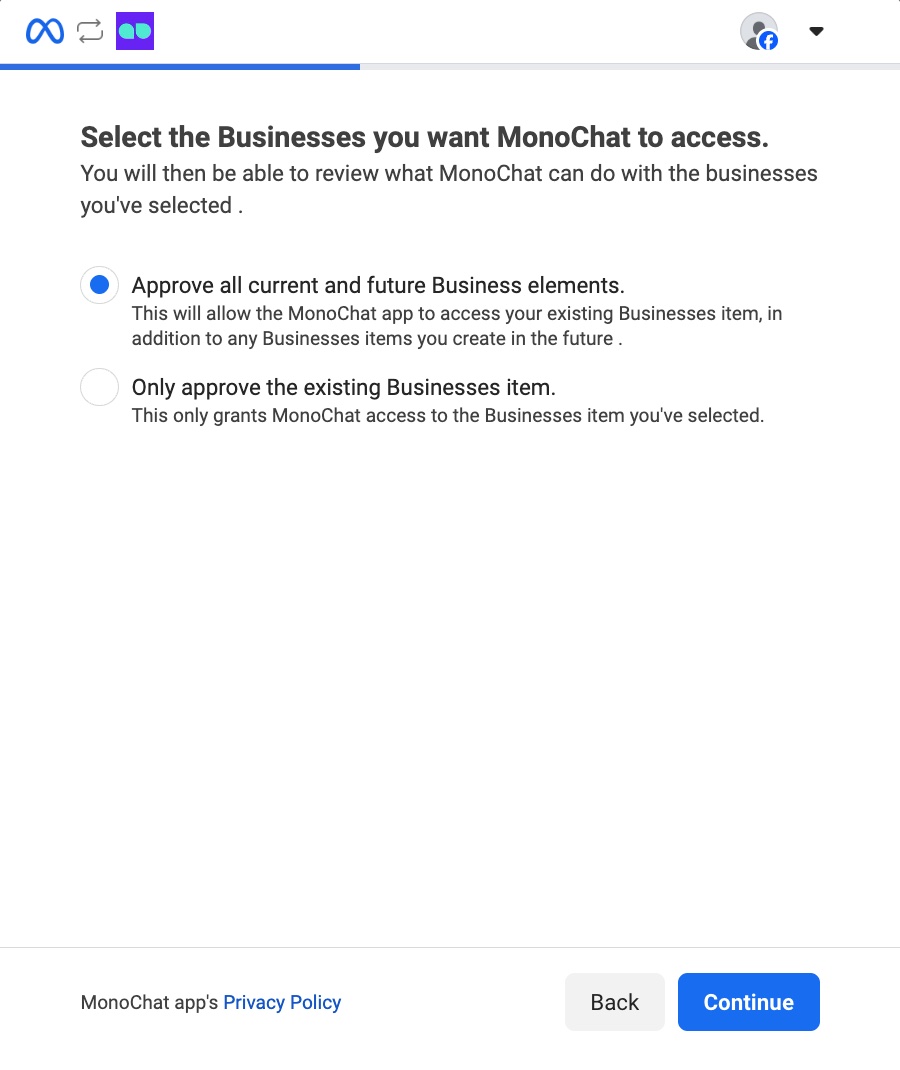
- Select the Businesses you want MonoChat to access.
- Approve all current and future Business elements: Grants MonoChat access to your existing Business assets and any new Business assets you create in the future.
- Approve only the selected Business: Limits MonoChat's access to only the specific Business asset you choose.
Once you’ve made your selection, click Next to proceed.
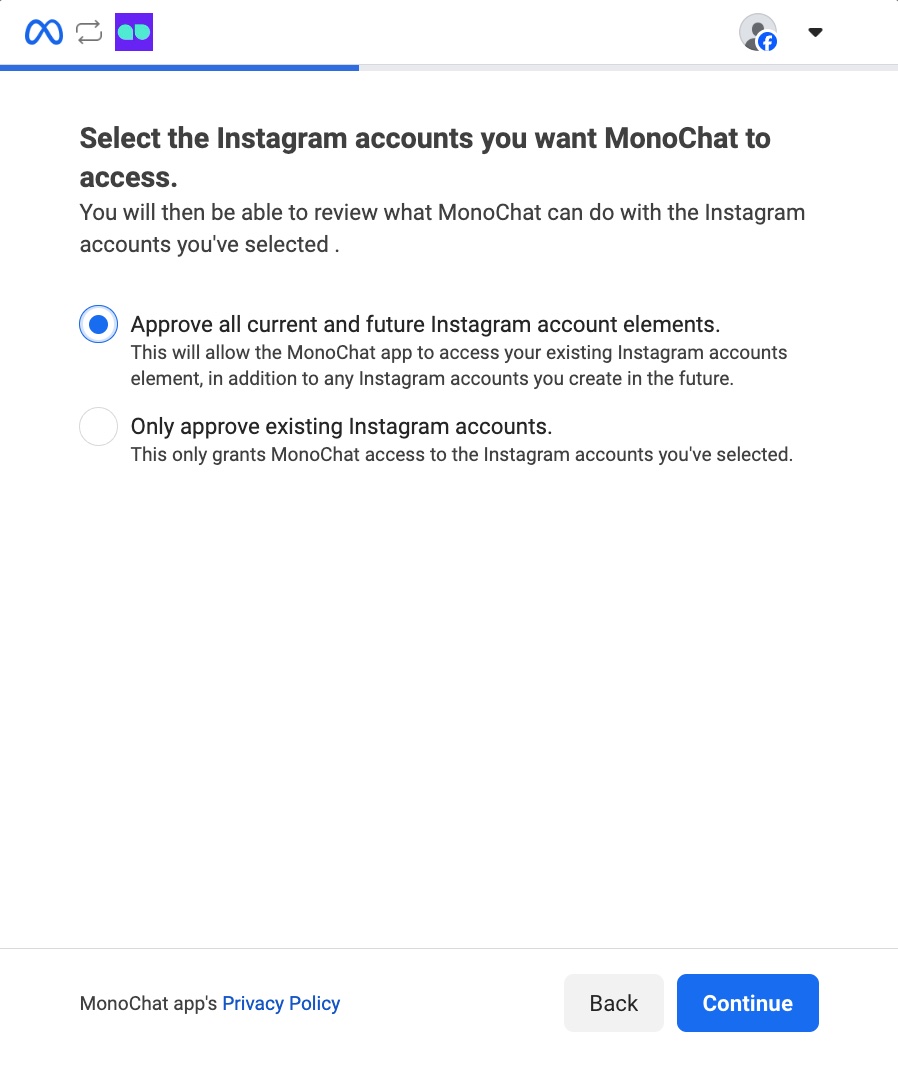
- Select the Instagram Accounts you want MonoChat to access.
- Approve all current and future Instagram Accounts: Grants MonoChat access to your existing Business assets and any new Business assets you create in the future.
- Approve only the selected Instagram Accounts: Limits MonoChat's access to only the specific Business asset you choose.
Once you’ve made your selection, click Next to proceed.
- Review MonoChat’s access permissions and click Save to continue.
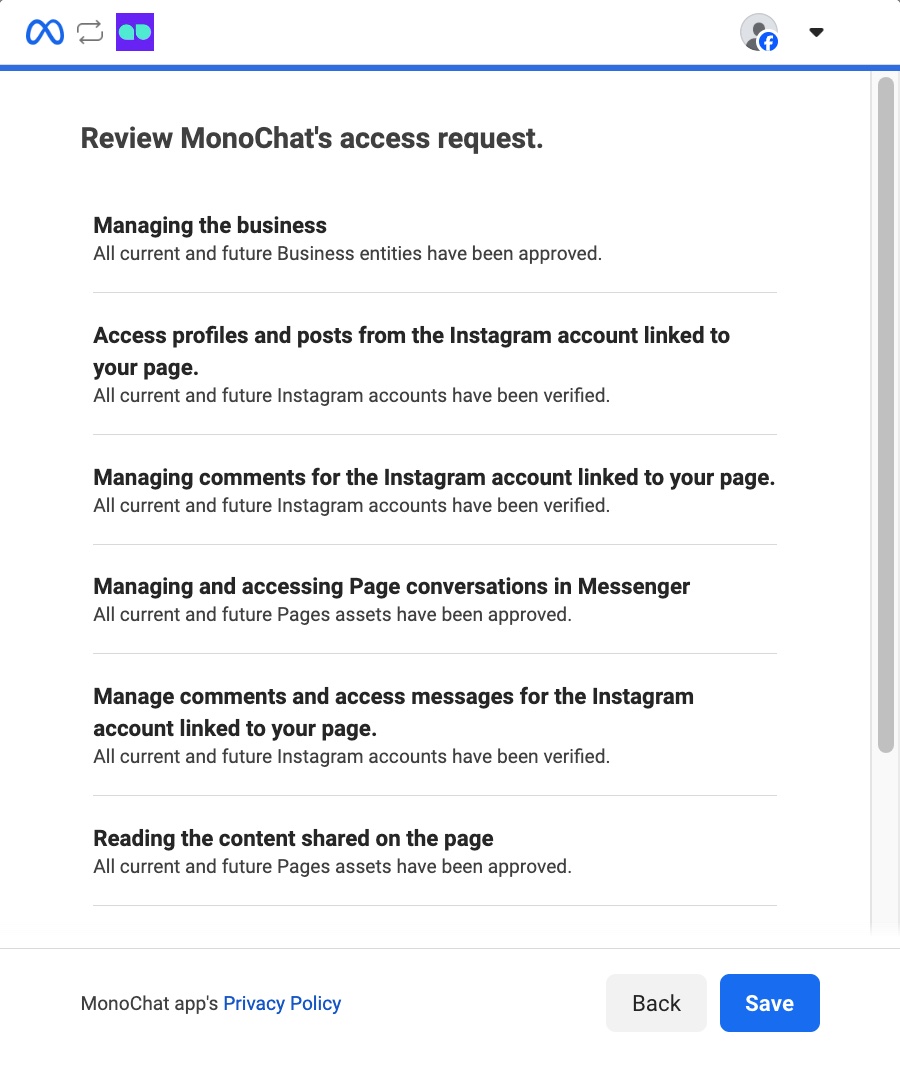
- After saving, the Meta pop-up will close automatically.
MonoChat will then display all available Instagram accounts on the right side.
Simply click Connect next to the account you want to link.
Facebook Messenger
- Select
Facebook Messengerfrom the list. - In the drawer, click Connect with Facebook.
- This will open a Meta (Facebook) login popup to continue the connection.
- If the popup does not appear, check your browser's popup blocker and allow popups for the MonoChat domain.
- In the Meta popup, you will see the screen titled “Connect your account to MonoChat.”
- If the currently logged-in Facebook account is correct, simply click Continue to proceed.
- If it is not the correct account, click Switch Account and log in with the appropriate Facebook account before continuing.
- Select the Facebook Pages you want MonoChat to access.
- Approve all current and future Pages: This grants MonoChat access to your existing Pages as well as any Pages you create in the future.
- Approve only the selected Page: This option limits access to only the specific Page you choose.
After selecting the appropriate option, click Next to continue.
- Select the Businesses you want MonoChat to access.
- Approve all current and future Business elements: Grants MonoChat access to your existing Business assets and any new Business assets you create in the future.
- Approve only the selected Business: Limits MonoChat's access to only the specific Business asset you choose.
Once you’ve made your selection, click Next to proceed.
- Select the Instagram Accounts you want MonoChat to access.
- Approve all current and future Instagram Accounts: Grants MonoChat access to your existing Business assets and any new Business assets you create in the future.
- Approve only the selected Instagram Accounts: Limits MonoChat's access to only the specific Business asset you choose.
Once you’ve made your selection, click Next to proceed.
- Review MonoChat’s access permissions and click Save to continue.
- After saving, the Meta pop-up will close automatically.
MonoChat will then display all available Facebook Messenger accounts on the right side.
Simply click Connect next to the account you want to link.
TikTok Business
- Select
TikTok Businessfrom the list. - In the drawer, click Connect TikTok Business.
- This will open a TikTok login popup to continue the connection.
- If the popup does not appear, check your browser's popup blocker and allow popups for the MonoChat domain.
- In the TikTok popup, you will see the screen titled “Log in to TikTok”
- If the currently logged-in TikTok account is correct, simply click Continue to proceed.
- If it is not the correct account, log in with the appropriate TikTok account, using your prefered method, before continuing.
- Sign in with the TikTok Business Accounts you want MonoChat to access.
- Review MonoChat’s access permissions and click Continue.
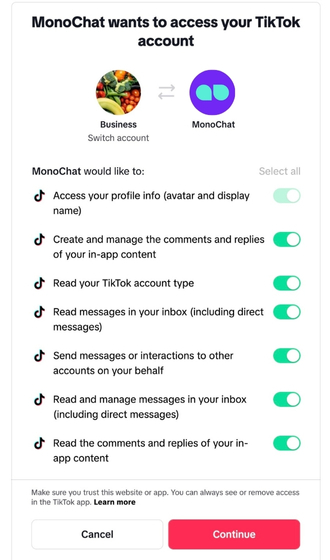
- After approving permissions, your channel will be connected and the TikTok popup will close automatically.
Telegram Bot
- Select
Telegram Botfrom the list. - Enter the
Telegram Bot Key. - Click
Saveto add the channel.
WebChat
- Select
WebChatfrom the list. - Fill in the necessary details: Name, Site URL, Welcome Message, etc.
- Click
Saveto add the channel.
SMS
- Select
SMSfrom the list. - Enter the necessary details such as provider credentials, phone number, etc.
- Click
Saveto add the channel.
Voice Channel
- Select
Voice Channelfrom the list. - Fill in the necessary details such as SIP account or provider credentials.
- Click
Saveto add the channel.
Getting Contacts to Message You
Most messaging apps require contacts to initiate the conversation before you can engage with them. To encourage new contacts to reach out, MonoChat offers QR codes and chat links as effective solutions. QR codes are perfect for use on posters, flyers, receipts, packaging, and business cards. Meanwhile, chat links make it easy for people to message you directly from social media posts, emails, and websites, seamlessly connecting you with your audience.
Step 1: Navigate to the Link Generator
To create a QR code or a click-to-chat link, navigate to Settings > Chat > Channels and find the link generator button next to your channel.
Step 2: Generate a custom link
Create a Custom QR Code
Generate a QR code for your WhatsApp Business API, Instagram, or other messaging channels and share it through various platforms. In the link generator drawer, select the QR code tab. You can create a pre-written message that will automatically populate when someone scans your QR code, making it easier for them to contact you. The QR code will automatically update whenever you change the message.
You may also choose to leave the message field empty, allowing users to start a conversation from scratch when they scan the QR code.
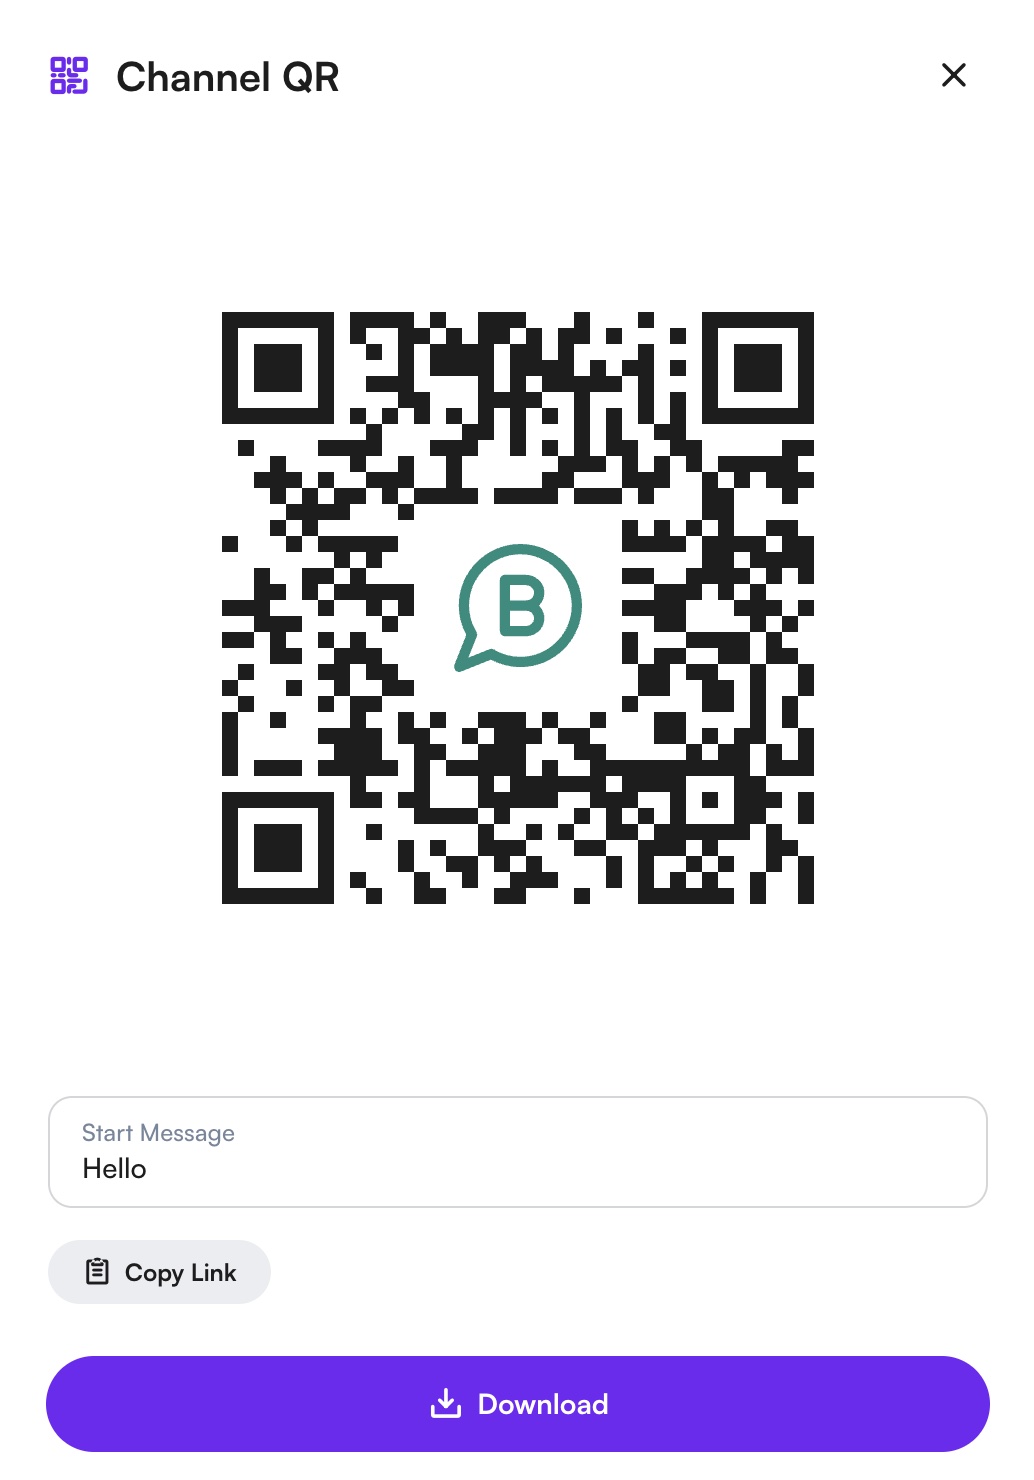
Once you are satisfied with your message, click the download button to download your QR code.
Create a Custom Click-to-Chat Link
Click-to-Chat links are a convenient way to invite people to start a conversation with you on MonoChat. In the qr generator drawer, you can write a pre-filled message that will appear automatically when someone clicks your chat link, making it easier for them to reach out.
If you prefer, you can leave the message field blank so users can start a conversation from scratch.
Once you’ve set your message (or left it empty), simply click the Copy Link button at the bottom of the drawer to copy your personalized WhatsApp link (e.g., https://api.whatsapp.com/).
Step 3: Promote Your Messaging Channels
Promote your messaging channels by embedding custom links and QR codes in your email signature, website, and social media profiles, and sharing them through marketing campaigns and newsletters. Regularly highlight your MonoChat channels on social media, in email campaigns, and on your website to drive more contacts and enhance your communication strategy.
Managing Channels
- View: To view the details of a connected channel, click on the channel name in the list.
- Edit: To edit the configuration of a channel, click on the edit icon next to the channel name. Make your changes and save.
- Delete: To remove a channel, click on the trash icon next to the channel name. Confirm the deletion when prompted.
Best Practices
- Integration: Ensure that each channel is properly integrated and authorized to avoid any disruptions in communication.
- Redundancy: Consider adding multiple instances of critical channels to ensure redundancy and continuous availability.
- Monitoring: Regularly monitor the performance and status of each channel to quickly address any issues that may arise.
By utilizing the Channels feature, businesses can efficiently manage their customer communications across multiple platforms, enhancing their reach and responsiveness on the MonoChat platform.