Flows
The MonoChat platform features an advanced Flow management system, which acts as a sophisticated Complex Event Processing (CEP) engine. This system allows businesses to automate their operations, manage customer interactions, and enhance marketing strategies through the creation of intricate workflows.
Complex Event Processing (CEP)
Complex Event Processing (CEP) is a technology used to process and analyze streams of information about events, and derive conclusions from them in real-time or near real-time. It enables the detection of complex patterns and relationships between events, facilitating immediate responses to emerging situations. CEP is widely used in various industries for monitoring, tracking, and automating processes that require real-time analysis and response.
MonoChat Flow Engine
MonoChat's Flow feature is an advanced CEP engine designed to help businesses automate their processes and workflows. It supports the creation of complex flows that can act as bots or execute various actions based on specific events.
Key Features
- Real-Time Processing: Flows can process events in real-time, enabling immediate responses to customer interactions and other triggers.
- Event-Driven Architecture: Flows are triggered by events such as receiving a new message, creating a new customer, or receiving a payment.
- Automation: Flows can automate repetitive tasks, enhancing efficiency and reducing the need for manual intervention.
- Customization: Businesses can tailor flows to their specific needs, creating bespoke solutions for their operations.
Flow Management Screens
Flow List Screen
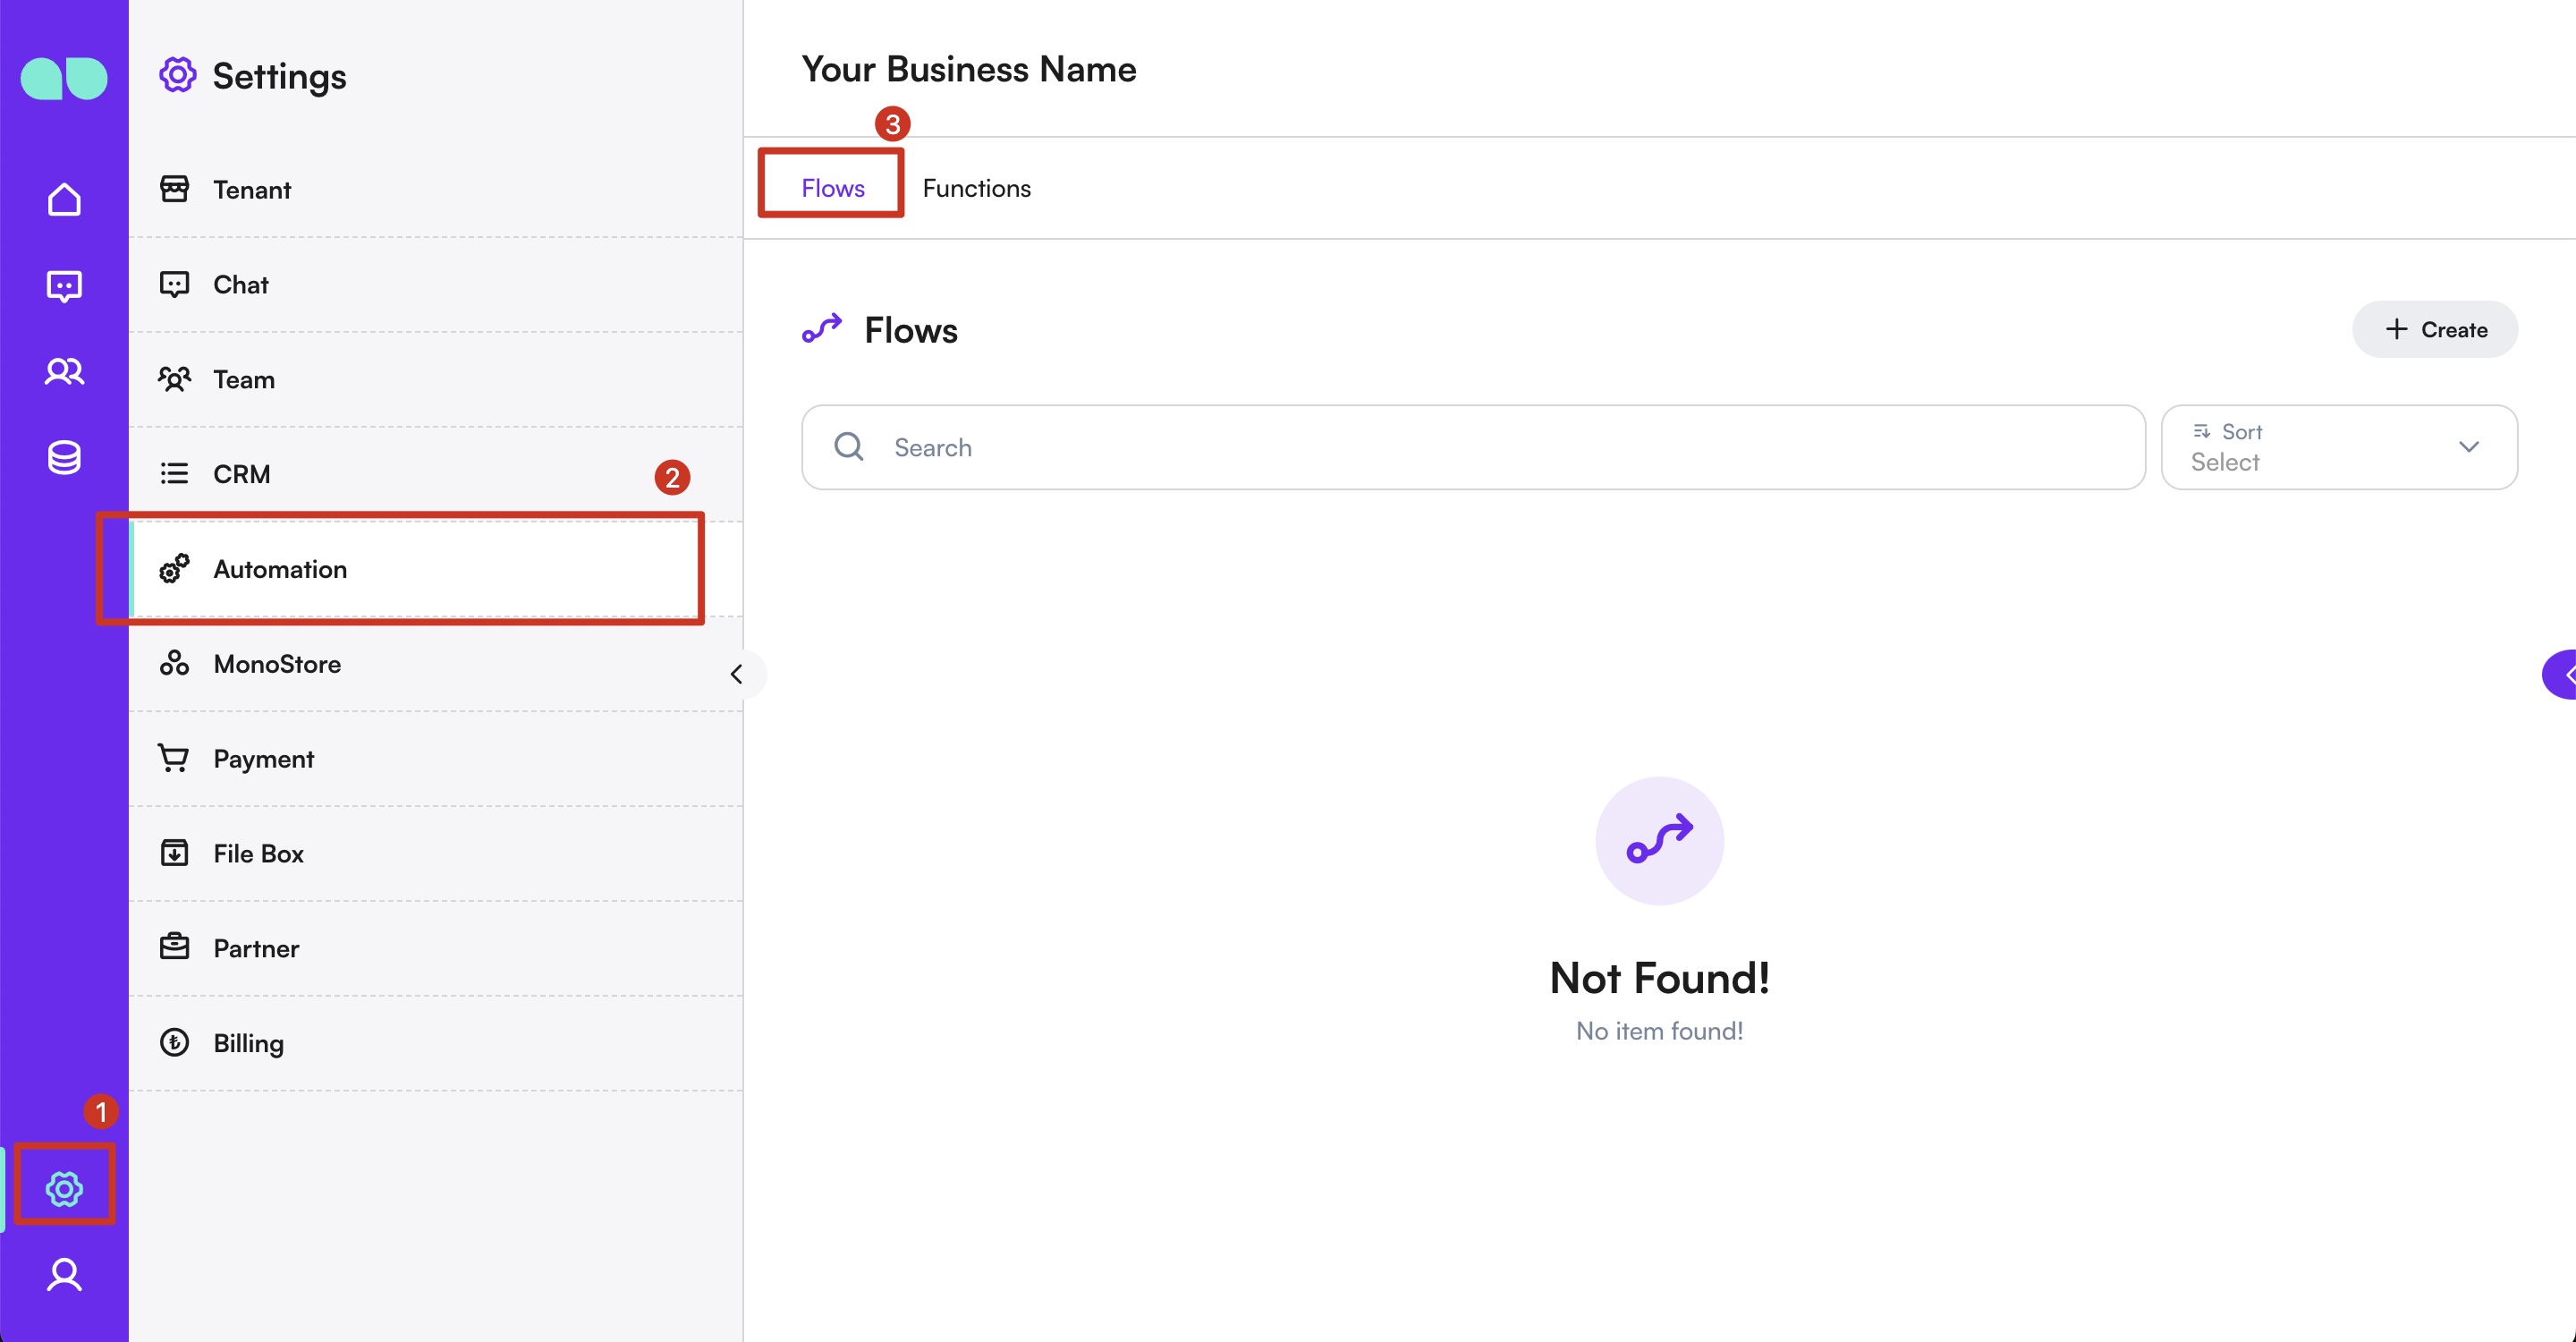
On the Flow List screen, you can view all existing flows. You can create a new flow, edit an existing flow, or delete a flow that is no longer needed.
Create Flow Screen
On the Create Flow screen, you can define the flow name and specify if the flow should act as a bot.
Flow Designer Screen
The Flow Designer screen allows you to create and configure nodes. You can add event nodes, action nodes, function nodes, and conditional nodes to design your flow.
Types of Flows
- Bot Flows: These flows act as chatbots during live sessions, automatically answering questions, providing information, and guiding customers through tasks. They keep the conversation context and help with support or sales without human help.
- Event-Driven Flows: These flows run when specific events occur, like receiving a payment or updating a profile. They automate tasks behind the scenes, such as sending notifications or updating records, without requiring a live conversation.
Creating a Flow
To create a flow, follow these steps:
- Define Flow Name: Enter the name of the flow. This name will be used to identify and manage the flow.
- Bot Behavior Option: Enable the "Is bot?" option if you want the flow to act as a bot. This allows the flow to behave as a bot during customer sessions.
- Define Events and Actions: Specify which events (triggers) will initiate the flow and what actions (responses) will be taken when these events occur. For example, sending a response when a new message is received or performing a task at a specified time.
Node Creation and Design
The Flow management system features a user-friendly drag-and-drop interface for designing flows. Users can create and connect nodes to build their workflows visually.
1. Creating Nodes
Event Nodes:
Trigger the flow when specific system or user actions occur.
-
Customer Events:
- New Customer Created: This event is triggered when a new customer is added to the system, allowing the flow to start actions related to customer onboarding, such as sending a welcome message or adding the customer to a mailing list.
- Profile Field Updated: This event occurs when any customer profile field (e.g., name, email, phone number) is updated. It can trigger actions like sending an update confirmation or syncing the data to another system.
- Customer Tag Added: Triggered when tags are added to a customer: by an agent, a flow, a bulk message or an ad referral. In the node you can list the tags it listens for, separated by commas; left empty, any tag starts it. Adding a tag the customer already has does not trigger it, and a flow is not started by a tag change made by its own node.
- Customer Tag Removed: The same, for tags removed from a customer by an agent or by the Remove Customer Tags node.
-
Flow Events:
- Flow Started: This event triggers when another flow is started. It can be used to kick off a sequence of actions based on the initiation of another process, allowing for more complex workflows.
- Flow Finished: This event is triggered when another flow completes. It can be used to trigger follow-up actions, such as sending a final message or updating records based on the flow's results.
-
Message Events:
- New Message Received: This event is triggered when a new message is received from a customer. It can be used to start actions such as responding automatically, tagging the customer, or forwarding the message to a support team.
- New Message Sent: This event fires when a new message is sent to the customer. It can be used to log the message or trigger follow-up actions like scheduling a reminder.
- New Reaction Received: Triggered when a user reacts (e.g., thumbs up, heart) to a message. This can help track engagement and prompt further actions based on the customer's interaction.
-
Session Events:
- New Session Created: Occurs when a new session is started with a customer. It can be used to initiate the customer support workflow, assign agents, or open communication channels.
- Session Reopened: This event happens when a session that was previously closed is reopened. It allows for re-engagement actions such as sending an update or reassigning the session.
- Session Closed: Triggered when a session is closed. Actions triggered by this event may include sending a "thank you" message or ending the flow with a feedback request.
- Session Assigned: This event fires when a session is assigned to an agent or team. It can be used to notify the assigned person or team that they have a new session to handle.
- Session Unassigned: This event is triggered when a session is unassigned from an agent or team. It could trigger actions like notifying a supervisor or reassigning the session.
-
Other Events:
- New Payment Received: This event occurs when a payment is received, allowing you to trigger actions such as updating the customer profile, sending a payment confirmation, or processing the next steps in the transaction.
- Wait is Over: Triggered when a wait timer expires. This event is useful for actions like following up with the customer or moving to the next step in a timed process.
- Custom Event: A user-defined event that can be set up for specific custom triggers. It allows you to define your own actions and responses for any specific business needs that are not covered by predefined events.
- AI Agent Run Finished: Triggered when an AI agent run of the customer ends. See AI Agents.
- Webhook Received: Triggered when another system sends a request to the webhook URL of this node. See Webhook Received Node.
- Lead Received: Triggered when someone fills a Facebook or Instagram lead ads form. See Lead Received Node.
Action Nodes:
Perform actions in response to events.
- Messaging Actions:
- Send Message: This action sends a message to the customer in the current session. It's used for communication, such as replying to customer inquiries or sending automatic updates.
- Send Short Message: Sends a quick predefined message to the customer, ideal for sending short responses or information that doesn’t require personalization.
- Send Template Message: Sends a pre-approved WhatsApp template message. This is particularly useful when communicating with customers outside the 24-hour window allowed for freeform messages.
- Create AI Chat Completion: This action generates a reply using AI, allowing the system to respond to customer messages dynamically and intelligently.
For more information on AI prompt generation, check out our AI Prompt Guide!
- Customer Profile Actions:
- Set Customer Profile Field: This action updates a customer profile field (e.g., name, phone number, email). It can be used to keep customer records up-to-date automatically.
- Set Customer Tag: This action adds a tag to the customer (one tag; variables are allowed). Tags can be used for segmentation, categorizing customers, or tracking specific attributes or behaviors.
- Remove Customer Tags: This action removes one or more tags from the customer. Separate several tags with commas; variables are allowed. Removing a tag the customer does not have changes nothing.
- Session Management Actions:
- Assign Session: This action assigns a session to an agent or team. It’s used to distribute customer inquiries to the right person or team.
- Unassign Agent From Session: Removes an agent or team from a session, which could trigger reassigning the session or notifying a manager for further action.
- Terminate Session: Ends the current session with the customer. This action can trigger follow-up processes like feedback requests or closing the conversation.
- Set Session as Poll: Marks the session for feedback collection, prompting customers to rate or review the service after the session ends.
- Payment Actions:
- Send Payment Request: Creates a payment order for the customer and sends the payment link in the chat. Choose a payment system (the default one is used if you choose none), enter an amount (variables are allowed) and a currency (your account's default currency is preselected). Turn off "Send the payment link in the chat" to create the order without sending a message. If the amount is not a positive number or no payment system is set up, the node takes its failed output and nothing is sent. Use the New Payment Received event to continue the flow once the customer has paid. Optionally write the message text yourself:
{{paymentLink}}in it is replaced with the payment link, and variables are allowed. Leave it empty to send the default message. To use the order later in the flow, turn on Save Flow Variable and enter a Flow Variable Name: the order's ID and its payment link are saved asflow.<name>.paymentSystemOrderIdandflow.<name>.paymentLink, for messages and for Flow Variable Value conditions (see Flow Variables).
- Send Payment Request: Creates a payment order for the customer and sends the payment link in the chat. Choose a payment system (the default one is used if you choose none), enter an amount (variables are allowed) and a currency (your account's default currency is preselected). Turn off "Send the payment link in the chat" to create the order without sending a message. If the amount is not a positive number or no payment system is set up, the node takes its failed output and nothing is sent. Use the New Payment Received event to continue the flow once the customer has paid. Optionally write the message text yourself:
- Flow Control Actions:
- Start Another Flow: This action triggers another flow to run, allowing you to create more complex multi-step workflows where one flow starts another based on certain conditions.
- Emit Custom Event: Sends a custom event to be caught by other flows or systems. This is useful for triggering actions in other workflows or external integrations.
- Set Flow Variable: Writes flow variables directly. Each row names a variable and an operation: Set stores a value built from
{{key}}variables as Text, Number or Boolean; Increase by and Decrease by add to or subtract from a number (an empty value counts as 1, a variable that does not exist yet as 0); Clear removes the variable. Rows run in order, so a later row can read an earlier one asflow.<name>. A value that does not fit its type, or an increase of a variable that is not a number, takes On Fail and leaves the variable as it was. See Flow Variables.
- Integration Actions:
- HTTP Request: Calls an address outside MonoChat and continues on Output or On Fail. It can save parts of the response as flow variables for later nodes. See HTTP Request Node.
Function Nodes:
Handle complex logic and integrations.
- Execute Function: Allows you to run complex logic or custom functions within your flow. This can be used to integrate external services or perform advanced calculations.
Hybrid Nodes:
Combine interaction and logic.
- Question Answer: Asks the customer a question and stores the answer for further use in the flow, such as personalizing responses or making decisions based on the answer.
- Wait: Pauses the flow for a specified amount of time. This is useful for handling time-sensitive actions or creating delays between events.
- Opt-in: Presents a consent request to the customer and stores their response. It’s useful for getting permission before continuing with certain actions, such as marketing or data processing.
- AI Agent: Runs a multi-step AI agent that can call models and tools several times before it answers, within an execution budget. The flow waits for the run and continues on Completed, Budget Exceeded, Timed Out, a content-filter output or On Fail. See AI Agents.
Conditional Nodes:
Make decisions to branch the flow based on specific criteria.
-
If Node: This node checks a condition (yes/no) and directs the flow based on the outcome. It allows you to create different paths depending on customer responses or system states.
-
Condition: Defines the logic that determines which path to take. You can create one or more condition groups using AND/OR logic. Each group can include checks based on:
- Customer:
- Profile Fields: Filter by user attributes such as name, phone number, gender, tags, or custom-defined fields.
- Customer Tag: Check whether the customer has any of the listed tags (includes) or none of them (not-includes). Separate several tags with commas.
- Identity Type: Check the channel through which the customer is communicating (e.g., WhatsApp, Web, Instagram).

-
Payment: Filters based on payment data like status or amount.
- Payment Amount: Compare the total payment amount with a specified value.
- Payment Currency: Filter based on the currency used (e.g., USD, EUR, TRY).
-
Date:
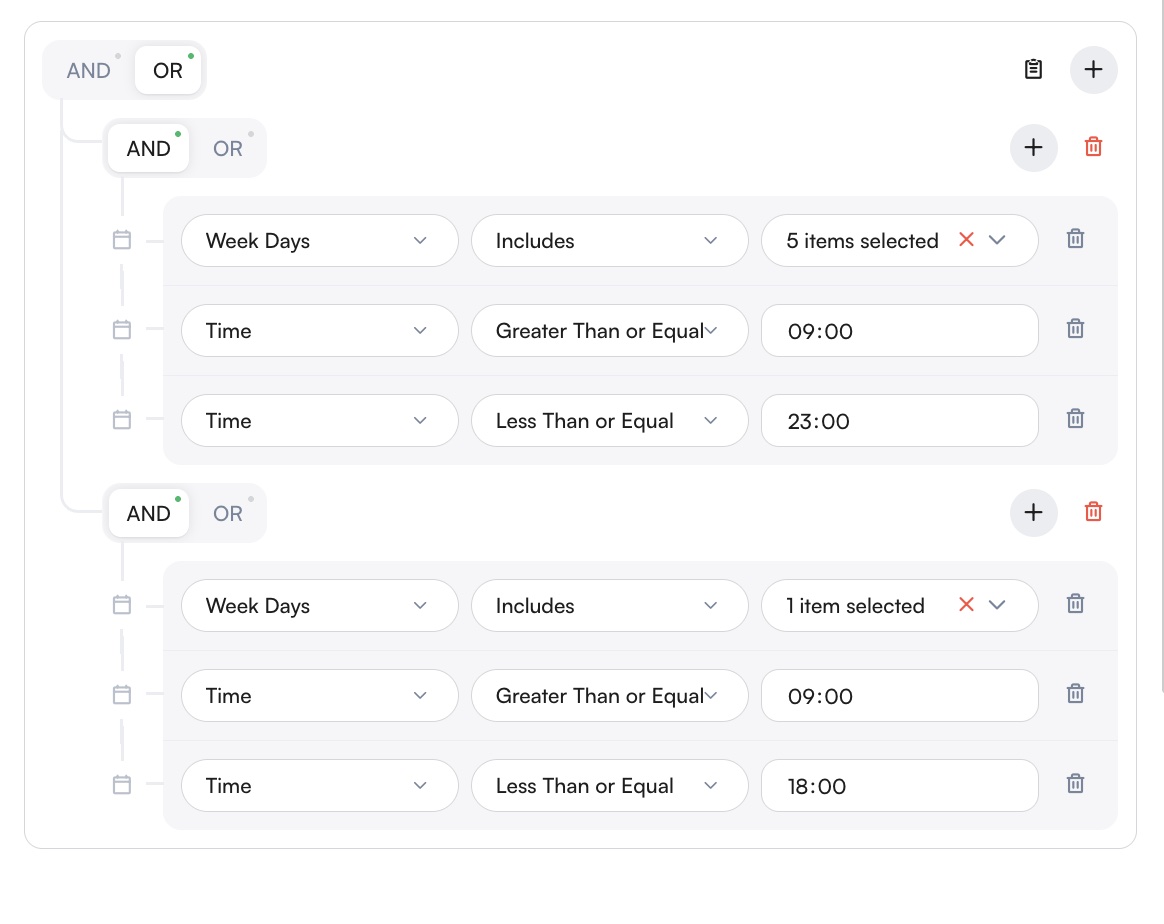
- Date & Time: Specify a precise date and time for triggering or skipping flow logic.
- Time: Apply conditions based on specific hours or time ranges (e.g., between 09:00–18:00).
- Weekdays: Filter logic by day of the week (e.g., only run on weekdays or weekends).
- Within Working Hours: Check whether the current time falls within the working hours saved in Settings › Team (evaluated in the tenant timezone).
-
Session:
- Session Type: Filter by the session category such as Bot, Bulk, Custom Flow, Spam, etc.
- Session Status: Determine if the session is currently open or closed.
- Channel Type: Filter by the type of communication channel, such as WhatsApp, Instagram, Webchat, etc.
- Channel: Specify the exact communication channel instance, such as a particular WhatsApp line or specific Instagram account.
- Customer Username: Apply conditions based on the username linked to the session.
- Termination Message: Evaluate the content of the message that ended the session.
-
Message: Conditions based on incoming message content (e.g., message text includes “price”) or message type (e.g., text, image, voice). Message Direction tells incoming messages (from the customer) from outgoing ones (sent by you).

- Flow: Previously set flow variables or values.
These rules allow you to tailor the flow dynamically—for example, only proceed if the customer sends a specific keyword, or if the message type is "text".
- Customer:
Multiple conditions can be grouped together using AND (all must be true) or OR (at least one must be true). This enables more advanced filtering logic to control flow behavior.
Switch Node:
Similar to the "If Node," but used for branching based on multiple possible outcomes. This is useful when there are more than two possible conditions to consider.
Random Split: Add it from the condition options and choose Random Split to run an A/B test or to send only a share of your customers down a new path. Add an output for each branch and give it a name and a whole-number weight of 1 or more (a new node starts with the outputs A and B, 50 each). Every time the flow runs, one output is picked at random with a chance equal to its weight divided by the sum of all weights, so weights of 70 and 30 send about 70% and 30% of the runs down each branch. The pick is not remembered: a customer who runs the flow again is drawn again. Connect each output to the nodes of its branch. To use the branch later in the flow, turn on Save Flow Variable and enter a Flow Variable Name: the name of the output the run took (for example A) is saved as flow.<name>, for messages and for Flow Variable Value conditions (see Flow Variables).
2. Connecting Nodes
- Drag-and-Drop Interface: Users can drag and drop nodes onto the canvas to build their flow.
- Linking Nodes: Nodes can be connected by dragging arrows from one node to another, establishing the sequence of events and actions.
3. The Flow Canvas
Every node is a card on the canvas, and every link is a line from an output to the node it leads to.
- Cards and warnings: A card shows the node's icon, type, name and summary, with its outputs at the bottom. Message nodes show the message text and one button per channel to switch the channel shown. A card with a problem has a warning badge, and the Warnings counter above the canvas lists them all; select an entry to jump to its node. A warning is raised when no link reaches a node, when a message is missing for a channel or a translation is missing for a language, when an output has no link, and when a condition is empty.
- Linking: Drag from the dot of an output to a node to link them, or drag the end of a link to another node to reconnect it. Select the plus button on an output, or drop a link on an empty spot, to choose a node type from a menu: the new node is created already linked. In a bot flow an output can have only one link; in other flows it can lead to several nodes.
- Links: Select a link to open a panel with its source node and output and its target node (select a node name to jump to it), and how many times the link was used in the last 7 days, with its share of the node's outputs. Insert node adds a node in the middle of the link and Delete removes the link.
- Nodes: Select a node to show Edit, Duplicate and Delete next to it; double-click a node to edit it. Hold Ctrl/Cmd or Shift to select several. Shortcuts: Delete or Backspace removes the selection, Ctrl/Cmd+A selects everything, Ctrl/Cmd+Z undoes, Ctrl/Cmd+Shift+Z or Ctrl/Cmd+Y redoes, and Ctrl/Cmd+C, X and V copy, cut and paste nodes.
- Notes: Add note places a resizable note in the middle of the view for your own remarks. Notes do not affect how the flow runs.
- Groups: Add group draws a named, resizable box around the selected nodes (an empty box when nothing is selected); the nodes inside the box belong to it. Choose its color with the palette button: Default, Blue, Green, Yellow, Orange, Red, Violet or Gray. The arrow on the group collapses it into one card with the number of nodes inside; select it again to Expand. Groups only organize the canvas.
- View controls: The buttons at the bottom right are Zoom In, Zoom Out, Reorder Layout (arranges the nodes automatically), Layout (opens Direction: Vertical or Horizontal, and Links: Simple or Colorful), Minimap (shows an overview map) and Activity in the last 7 days (shows how much each link was used). The direction and link style are remembered in your browser.
- Saving: Save is highlighted while there are unsaved changes, and closing the flow asks you to confirm. Saving stores the links, node positions, notes and groups.
HTTP Request Node
The HTTP Request action node sends a request from the flow to an address outside MonoChat, for example to look up an order in your own system. Add it from the action nodes, name it and fill in the form:
| Field | What it does |
|---|---|
| Method | GET, POST, PUT, PATCH or DELETE. GET is the default. |
| URL | The address to call, starting with http:// or https://. Required. |
| Query Params | Key and value rows, kept in sync with the part of the URL after ?. |
| Path Variables | A segment written as /:name in the URL, for example /orders/:orderId, adds a row here; enter its value. |
| Headers | Request headers as key and value rows. |
| Authorization | No Auth, Basic Auth or Bearer Token. Basic Auth sends the Username and Password base64-encoded and Bearer Token sends the Token; both go in the Authorization header and replace one added under Headers. These fields can hold {{key}} values too. |
| Body Type | None, JSON, Text or Form. The body is sent only with methods other than GET; Form sends key and value rows as form fields. |
| Timeout (ms) | How long to wait for the response, 10000 by default and never more than 30000. |
In the URL, query params, path variable values, headers and body, write a value as {{key}}, for example {{customer.id}} or {{message.text}}. A value that does not exist becomes empty text. Values in the URL and in path variables are URL-encoded.
In a JSON body, put the variable in quotes, as in "{{session.id}}", to send it as text. Without quotes, a value that is valid JSON (a number, true or an object) is sent as it is and anything else is sent as text. Unless you add your own Content-Type header, MonoChat sets it to application/json, text/plain or application/x-www-form-urlencoded to match the body type.
{
  "orderId": "{{flow.order.id}}",
  "customerId": "{{customer.id}}"
}
The node reads the response as a status, headers and data. If the response content type is JSON, the data is the parsed JSON, otherwise it is text. Redirects are followed only for GET requests, and requests to blocked internal addresses are refused.
The node continues on On Fail when the response status is not 2xx, when the request fails or times out, when a JSON response cannot be parsed, when a response is larger than 1 MB, when a flow variable cannot be saved, or when the workspace has used up its limit of outgoing HTTP requests for the current minute. In every other case it continues on Output.
Test Request sends the request for real and shows Response Headers (with the status), Response Body and, when a flow variable is saved, Flow Variable Preview. To test with real values, use Sample Data. A workspace can send 20 test requests per minute, and a node that saves a flow variable can be saved only after Test Request has run with its current settings without an error.
Webhook Received Node
The Webhook Received event node starts a flow when another system, for example your online store, sends a request to a URL that belongs to the node. Add it from the event nodes, enter a name and select Create. The settings of the node then open with its webhook URL and secret. Every node gets its own URL and secret when it is created.
| Field | What it does |
|---|---|
| Webhook URL | The address to send a GET or POST request to. It answers 202 once the flow is queued. Anyone who has the URL can start the flow, so keep it secret. Use the copy icon to copy it. |
| Require Secret | Off by default. When on, requests without the secret are rejected with 401, test requests included. |
| Secret | Shown when Require Secret is on, with a copy icon. |
| Token Header | The header that carries the secret, Authorization by default. |
| Signature Header | The header that carries a signature, X-Signature by default. |
| Channel | The channel the customer is found or created on. Required. |
| Identity Path | Where the customer identity is in the request, request.body.phone by default. Required. |
| First Name Path, Last Name Path | Optional paths of the customer's first and last name. |
The secret is accepted in either header. In the token header send the secret on its own or as Bearer <secret>. In the signature header send the hex HMAC-SHA256 of the raw request body, computed with the secret, on its own or as sha256=<signature>. A signature never reveals the secret and stops working if the body is changed. Select the pencil icon to change the header names if the sending system uses its own, for example X-Salla-Signature.
curl -X POST "<webhook URL>" \
  -H "Authorization: Bearer <secret>" \
  -H "Content-Type: application/json" \
  -d '{"phone": "<customer phone number>", "orderId": "1001"}'
The flow runs for the customer found at the Identity Path, on the selected Channel; the customer is created when it does not exist yet. The request is available to the flow as request.body, request.query and request.headers, so paths start with request, for example request.body.orderId or request.query.status. To use values from the request in later nodes, turn on Save Flow Variable: it works as described in Flow Variables, with paths that start with request, and a new node starts with a row that stores request.body.orderId as orderId.
The flow runs only while it is active. The request is answered as follows:
| Status | When |
|---|---|
| 202 | The flow was queued. |
| 401 | Require Secret is on and neither header holds the secret or a valid signature. |
| 404 | The URL is unknown, or the flow is not active. |
| 413 | The body, query and headers together are larger than 65,536 characters. |
| 422 | The channel was not found, no customer identity was found at the Identity Path, or a flow variable could not be saved. The response says which. |
To see what a sending system really sends, add /test to the end of the webhook URL and send a request to it. While the settings of the node are open, the request appears under Captured Request with its body, query and headers; it does not start the flow, and the flow does not need to be active. The secret is checked for test requests too, and the last captured request is kept for 10 minutes.
Lead Received Node
The Lead Received event node starts a flow when someone fills a Facebook or Instagram lead ads form. Leads reach MonoChat through a connected Facebook page: open the page under Settings › Channels and turn on Lead forms. Instagram ad leads come through the linked Facebook page.
| Field | What it does |
|---|---|
| Lead Forms | The forms that start the flow. Leave it empty to start the flow for every form. Only forms that have already sent a lead are listed. |
| Channel | The channel the customer is found or created on. Only channels whose customers are identified by phone number (such as WhatsApp and SMS) or by e-mail address are listed. Required. |
The customer is found or created on the selected Channel with the contact the person typed in the form: the phone number on a phone channel, the e-mail address on an e-mail channel. A lead without a valid phone number or e-mail address for the channel does not start the flow. The form's name, phone and e-mail answers are written to the customer's profile; when the form asks only for a full name, the last word becomes the last name.
The flow runs only while it is active. Meta sometimes delivers the same lead more than once; MonoChat stores it once and starts the flow for it only once.
To use the lead in later nodes, turn on Save Flow Variable: it works as described in Flow Variables, with paths that start with lead, and a new node starts with a row that stores lead.fullName as name. Latest Lead shows the newest lead of the selected forms, so you can see which paths it has:
| Path | Value |
|---|---|
lead.id, lead.createdAt | The ID of the lead and when it was submitted. |
lead.form.id, lead.form.name | The form that was filled. |
lead.ad.id, lead.ad.name | The ad the form belongs to. |
lead.fullName, lead.phoneNumber, lead.emailAddress | The contact answers of the form. |
lead.answers.<question> | The answer to any other question of the form. |
Flow Variables
A flow variable keeps part of a node's result so that later nodes in the same run of the flow can use it. The HTTP Request node and the function node (listed as Custom Flow Node) can save one. The Webhook Received node can save one too, with paths that start with request (see Webhook Received Node), and so can the Lead Received node, with paths that start with lead (see Lead Received Node). Turn on Save Flow Variable and fill in:
- Flow Variable Name: starts with a letter and contains only letters, numbers and underscores. It must be unique in the flow.
- Flow Variable Mapping: one row for each value to keep, with a key (same rules as the name), a path into the result and a type (Text, Number or Boolean). Paths start with
response:response.status,response.headersorresponse.data.titlefor an HTTP request, andresponsefor the value a function returns. A new HTTP request node starts with a row that storesstatus.
The value at the path must have the chosen type, otherwise the node fails. All values of one variable together may not exceed 16 KB.
The Set Flow Variable action writes a variable directly, without a mapping: its rows set a value built from {{key}} variables (as Text, Number or Boolean), increase or decrease a number, or clear a variable, and the same name may be written by several Set Flow Variable nodes in one flow. A typical use is a retry limit: a Set Flow Variable node that increases attempts by 1 after each question, then a Flow Variable Value condition flow.attempts ≥ 3 that leads to an Assign Session node. A forked branch gets a copy of the variables at the fork, and what it writes does not change the other branch.
A variable named order with the key id is written as {{flow.order.id}}. Use it in the HTTP Request fields, in the texts of the messages the flow sends (for example Send Message, Send Short Message and Send Comment) and in conditions.
In Set Customer Profile Field, choose From a Variable for a field to fill it from a variable, for example {{message.payload.formData.email}} from a WhatsApp Flow form or {{flow.order.total}} from an HTTP request. The value must fit the field: a number for a number field; an ISO 8601 date (2026-11-05 or 2026-11-05T14:30:00Z) or a Unix timestamp in seconds or milliseconds for a date field; a valid phone number for a phone field and a valid address for the email field; one of the options for a list field, or for an advanced list one option's ID or one of its names; one of your active languages for a language field. If a variable is empty or its value does not fit, the other fields are still saved and the node takes its On Fail output.
Besides flow variables, these values can be written as {{key}} as well:
session.id
session.connectorBrand
session.channelUsername
session.customerChannelUsername
session.conversationId
session.assignedUserId
session.search.assignedUser.identity
session.search.assignedUser.profile.firstname
session.search.assignedUser.profile.lastname
session.search.channel.title
session.search.customerChannel.displayIdentity
customer.id
message.id
message.text
message.type
message.payload
flow.id
flow.instanceId
tenant.slug
message.payload holds the content of the message as JSON, and each of its fields can be read as message.payload.<field>. The customer and profile field variables used elsewhere in MonoChat, such as customer.profile.firstname, work too. In the HTTP Request node and in messages, agent.profile.firstname, agent.profile.lastname and agent.identity hold the user the session is assigned to, and are empty when the session has no assigned user.
In a condition, the Flow group has Flow Variable Value. Choose a variable, an operator and a value; only variables saved with a key and a type, and those of Random Split nodes as text, are listed, and the operators depend on the type:
- Text: Includes, Not Includes, Starts With, Not Equal, Equal, Regular Expression
- Number: Not Equal, Equal, Greater Than, Less Than, Greater Than or Equal, Less Than or Equal
- Boolean: Not Equal, Equal
The condition is false when the variable has no value in this run.
Sample Data
Variables have values only while a flow runs. To see real values while you build the HTTP Request node, turn on Select Sample Data in its form; the Sample Data panel opens next to the form.
- Select Select Sample Session and pick one of the 20 most recent sessions. Use the message icon (Select Sample Message) to also pick one of that session's last 20 messages, or the check icon (Use without a message) to pick the session alone.
- The panel lists the variables with their sample values, grouped as Customer, User, Profile Fields, Session, Message, Flow and Tenant. The copy icon next to a key copies it as
{{key}}. - Show Raw Data shows the session, message and flow run as JSON, Show Table goes back to the list and Reset clears the selection.
The sample values are used only by Test Request; when the flow runs, it uses its own session and message. Flow values come from the latest run of this flow in the chosen session, and customer identity, phone number and email are shown only if your role may see them.
Use Cases
Customer Support Automation
- Customer Interaction Automation: Automate customer interactions by designing workflows that handle common queries, guide users through processes, and provide timely responses. This ensures a consistent and efficient customer experience.
- Customer Support: Create bot flows to automatically respond to customer support requests and provide solutions, improving response times and satisfaction.
Marketing Campaigns
- Marketing Automation: Design flows that automate marketing processes, such as sending promotional messages or following up with customers based on their interactions. This helps in engaging customers effectively and driving conversions.
Internal Process Automation
- Internal Process Management: Develop flows to streamline internal business processes, such as task assignments, reminders, and notifications. Use flows to automate processes like data synchronization, report generation, and task management, improving efficiency and reducing the need for manual intervention.
- Complex Business Logic: Implement complex business logic that involves multiple steps and conditions. Flows can handle intricate processes, ensuring that each step is executed correctly and efficiently, reducing errors and improving overall business operations.
MonoChat's Flow management system is a powerful tool that enables businesses to create dynamic, automated workflows tailored to their specific needs, enhancing efficiency and customer satisfaction.